flexiblefullpage
interstitial1
Currently Reading

Best Practice: Fat-Wall Window Bucks

Advertisement
billboard
Construction Practices

Best Practice: Fat-Wall Window Bucks

Carefully installed window bucks make for secure fastening and easy alignment of windows and exterior trim 


By By Dan Morrison and Sal Alfano September 14, 2017
Installing fat-wall window bucks
This article first appeared in the August 2017 issue of Pro Remodeler.

Wrapping a building with rigid insulation creates a tight thermal envelope that minimizes heat loss via conduction through the framing. At windows, it’s important to preserve that thermal break while also providing a solid nail base. David Joyce and his crew at Synergy Construction, in Lancaster, Mass., solved the problem on a recent deep energy retrofit on which they wrapped the building in two layers of 2-inch foam. After the first layer was installed, they framed the perimeter of window openings using 2-by material padded out with ½-inch plywood to match the 2-inch foam thickness. Here’s a step-by-step look at how they did it, adapted from a video at ProTradeCraft.com.

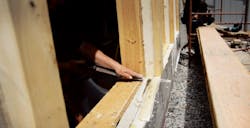
Fat-Wall Window bucks-1This top piece spans a series of three identical windows. Calvin and David (in the hat) have fastened each end and are using a straightedge to make sure the 2-by isn’t bowed in the middle, which could create alignment problems later when the trim is installed.


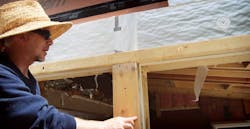
Fat-Wall Window bucks-2In a bank of windows like this, making sure the wood bucks are straight and level helps with alignment during window installation. Here, David aligns an intermediate vertical buck with a centerline marked on the top piece to ensure even spacing.


Fat-Wall Window bucks-3Damien applies pressure to straighten a side buck while it’s fastened to the frame with a 6-inch screw. Countersinks for the screwheads are created ahead of time using a spade bit.


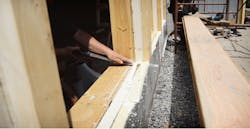
Fat-Wall Window bucks-4Fastening the bucks with screws can compress the foam and create a wavy surface. Use a straightedge and tighten or backout fasteners as necessary to make sure the bucks are flat.


Fat-Wall Window bucks-5The last step before installing the windows is to flash the opening. In this case, a starter strip for the second layer of foam was run under the windows, then cut on a bevel to promote drainage of any water that might penetrate the opening. The double layer of foam at the sills will be flashed with peeland- stick tape, so the wood bucks are omitted to promote drainage.

Next: Flashing the openings

Get more Jobsite Know-How here


Add new comment

Plain text

  • No HTML tags allowed.
  • Web page addresses and email addresses turn into links automatically.
  • Lines and paragraphs break automatically.
leaderboard2

Related Stories

How to Weatherize Roof-Wall Intersections

Mitigating moisture between changes of materials and panes requires special attention

3 Steps for Installing House Wrap and a Rainscreen

ProTradeCraft's Building Resilience walks you through how to install a self-adhered house wrap, liquid flash obstructions, and top it off with a rainscreen

How to Insulate a Heated, Structural Slab with XPS

ProTradeCraft's Building Resilience season three starts with making a basement more comfortable

How to Retrofit Foundation Footings

To make a low-height basement a more comfortable living space, this remodeler digs deeper but needs to add support to do so

6 Must-Knows for Installing Pocket Doors

Save your sanity: Do it right the first time

Crawl Spaces to Basements: Proceed with Caution

Converting a crawl space to other uses can upgrade a home and add significant value, but when done incorrectly, it can also be disastrous 

Webinar: Project and Trade Management Musts—The New American Remodel 2023

Access the webinar here to learn project and trade management lessons from The New American Remodel 2023

How to Attach a Patio Roof to an Existing House

Discover expert tips on how to attach a patio roof to an existing house. Elevate your homeowner clients' outdoor living spaces with our comprehensive guide.

How To Improve Energy Performance in Existing Attics

There’s more to insulating the attic than attic insulation; there’s venting, air sealing, and misery

Model ReModel 2022: A Case Study in Sustainable, Thoughtful Construction

The eighth annual Model ReModel project features an accessory dwelling unit, designed for aging in place, attached to a 19th-century Victorian

Advertisement
boombox2
Advertisement
halfpage2
Advertisement
native1

More in Category


Advertisement
native2
Advertisement
halfpage1
Advertisement
leaderboard1