Radon is a colorless, odorless gas that can be found all across the U.S. As a natural byproduct of uranium decay in soil, radon is radioactive: according to Radon.com, the alpha radiation emitted by radon gas is the same as that emitted by other sources, such as plutonium. Radon can find its way into any type of building, typically seeping into the basement through exposed soil or via cracks in the foundation or slab.
As awareness of the danger posed by radon grows, many home buyers and sellers test for levels of radon above 4 pCi/L (picocuries per liter), the EPA’s recommended action level for radon exposure. Fortunately, the radon hazard can be mitigated in both new and existing structures by capturing the gas and venting it to the outdoors. In “radon-resistant new construction,” this typically involves a layer of sub-slab stone that promotes air movement, and a sub-slab layer of polyethylene sealed to a PVC riser that penetrates the slab and runs through the roof to daylight. If radon is detected after construction is completed, the PVC riser can be cut and an in-line fan installed to draw radon out of the building.
Learn how to lift some serious weight. Read more here.
Unfortunately, radon-resistant construction techniques were rarely followed in homes built before the 1990s, and are still not required by code in some jurisdictions. To find out how radon gas is handled in most older existing homes, we turned to Erickson Foundation Supportworks, a Hudson, New Hampshire-based foundation and concrete repair company whose services include radon mitigation. (Note: This article does not cover testing for radon, but numerous sources are available online that describe when and where to test, the type of test to undertake, and how to interpret the results.)
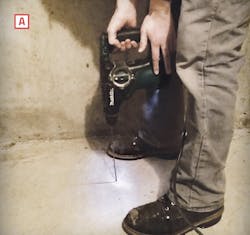
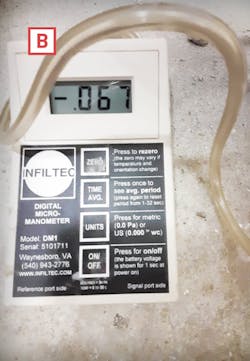
1 To test the slab for air-tightness, the crew drills through the slab [A], then connects a digital manometer to record air pressure [B]. Erickson’s crew uses a long 3⁄16-inch masonry bit because it makes for a very tight fit for the manometer testing tube.
Steps to Install a Radon Mitigation System
1] Check the Slab for Air Leaks
Radon mitigation typically involves running a PVC pipe system from one or more holes in the slab, and installing an in-line fan to draw in sub-slab air and push it outdoors above the roof. But for the vacuum created by the fan to work properly, the slab must be airtight. So the first step is to check for air leaks 1 .
The number of test holes needed depends mainly on how many radon “zones” the house has. “A perfectly square house with no interior footing, no crawlspaces, and no raised or lowered slabs will have one zone,“ explains Andrew Ahlquist, Radon Mitigation Specialist at Erickson Foundation Supportworks. “Every time you add a separation, like a footing or raised or lowered slab, you add a new zone.” Crawlspaces also count as separate zones.
Every zone gets a manometer test and at least one penetration point, but the level of radon also affects the number of penetrations. “If a 1,200-square-foot house has a radon reading of 6 pCi/L,” Ahlquist says, “we will most likely only suggest one penetration point. But if that same house has a reading of 35 pCi/L, we would probably recommend a penetration point at each side of the house.“ Ahlquist also says that the type of soil can affect the system design. “Crushed stone is the perfect soil for easy air flow across a basement, but if the crew discovers that it’s hard-packed clay, they might suggest another penetration point to the customer.”
Test holes are typically drilled far away from proposed penetration locations for a radon mitigation system―usually on the opposite side of the zone. This enables the crew to retest again from the same point after the installation is complete, when a negative manometer reading is an indication that any leaks have been sealed and the system is working properly.
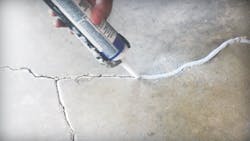
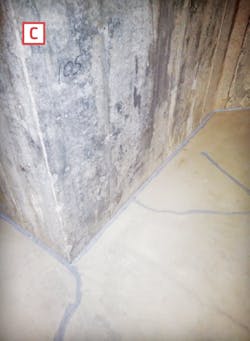
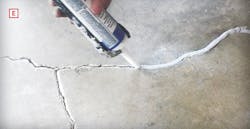
2 The cold joint between the slab and foundation walls often develops a gap that needs to be sealed [C], as do obvious cracks in the field of the slab. Small cracks can usually be sealed as-is, but sometimes using a grinder to widen the crack [D] will result in a better seal [E].
2] Seal Cracks
The overall goal of the system is to suck up most of the sub-slab air rising through the soil. The more airtight the slab, the better the suction, which increases the amount of air―and radon―the system removes.
When the manometer test shows poor suction, the crew checks for cracks, starting with the perimeter. Slabs are typically placed after the walls, and over time a gap can develop at the “cold joint” at the perimeter. This and any obvious cracks in the field of the slab 2 are sealed with NexusPro, a silicone-based, UV-resistant sealant with a fast drying time. For large cracks, the crew carries an assortment of backer rod ranging from ¼-inch to 1½-inches in diameter. Ahlquist says that most small cracks can be sealed as-is, but sometimes they use a grinder to create more surface area, which improves the chance for a good seal.
After the cracks have been sealed, the crew repeats the manometer test. Depending on the results, they may use a smoke pencil to check for leaks at small cracks that were not sealed the first time through. The tests may also lead to an increase in the number of penetrations.
Have trouble staying on task? Here are time management tips from the 2020 Extreme Sales Summit.
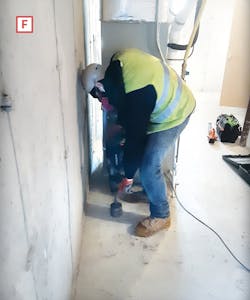
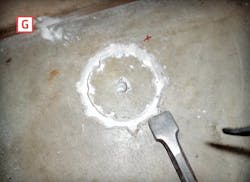
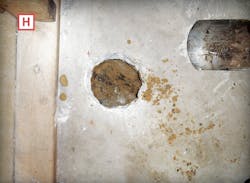
3 The fastest and easiest way to drill through the slab, especially when many penetrations are needed, is with a wet coring bit [F] mounted in either a hand-held drill or a portable drilling machine. For smaller projects, another option is to use a standard masonry bit to drill a series of smaller holes to outline the larger penetration [G], then use a cold chisel to remove concrete until the slab is exposed [H]. The ragged edge of the opening will eventually be covered when the PVC pipe is sealed to the slab.
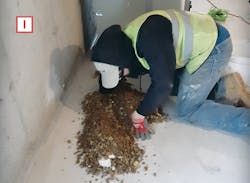
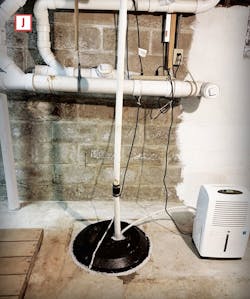
Loose, sandy soil can usually be removed by hand [I] or with a shop vac; occasionally, more densely-packed soil must first be loosened using an auger bit at slow speed. A sump pump may be necessary to remove sub-slab water, which interferes with radon gas collection. Although sump pits are usually open to the air, where radon is present, the pit must be sealed [J] so that no air is released into the living space.
3] Cut Holes in Slab, Remove Soil
Wet coring bits mounted in a hand-held drill or on a portable drilling machine will drill a clean hole in the slab, but a series of holes drilled using a standard masonry bit will also do the job 3 .
To create more surface area for the suction to act on, up to 10 gallons of soil should be removed from under the slab in the area around each hole for a radon mitigation system. This can usually be done by hand or with a shop vac. In cases where water is present under the slab, a sump pump may have to be installed.
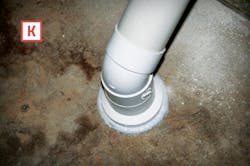
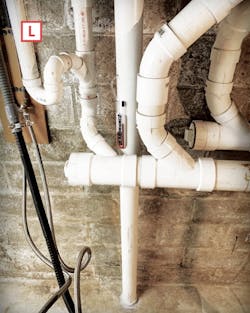
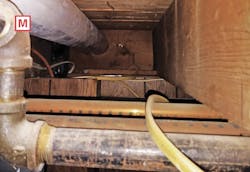
4 PVC risers typically come straight off the slab holes with only small offsets [K]. Penetrations are often located in basement corners or near existing plumbing where they
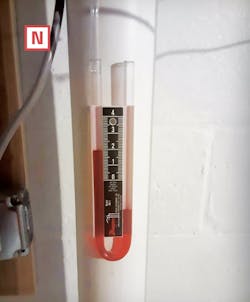
are less conspicuous [L]. Like plumbing vent lines, horizontal runs pitch slightly upwards. Occasionally floor framing allows horizontal piping to be concealed in a joist bay [M]; more commonly, however, piping runs below the joists, then bends up and over the foundation wall, exiting through the rim joist to the outdoors. A U-tube manometer is permanently mounted on the pipe in the basement [N]. When the fan is operating, homeowners can check the fluid in the manometer on the side that has a small tube extending into the pipe. If it reads above zero, the air is being vacuumed upward and the system is working correctly.
4] Install and Seal PVC Pipe System
Designing the PVC piping system begins with the location of the penetrations 4 . “If possible,” says Ahlquist, “we try to locate penetrations in basement corners where they can be more easily hidden.” In new construction, the stack can run through closets or mechanical chases all the way to the roof. In retrofits, however, risers more often join a horizontal run in the basement that vents to the outside. “If the floor framing allows, we can run the pipe between the joists,” says Ahlquist. “But we do have to keep a pitch on the pipe as well, which sometimes leaves us with limited areas to run the pipe.”
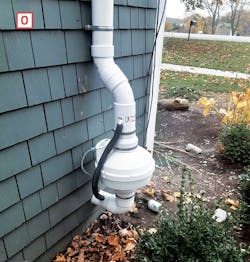
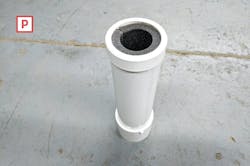
5 In retrofits, the inline fan is commonly mounted to the exterior for a radon fan installation [O]. Some fans are pre-wired to a junction box that is mounted to the wall; wiring running inside can connect to a circuit breaker or be plugged into an existing outlet, so long as continuous power is applied. The radon fans themselves are quiet, but an optional muffler [P] can be mounted to the end of the PVC to damp the sound of moving air in a radon fan installation.
5] Mount and Wire the Fan
In new construction, the in-line fan is often mounted in the attic. Occasionally in a retrofit, the pipe can run through an interior space, such as an attached garage, then daylight through the roof to create a radon mitigation system. More commonly in retrofits, however, the fan is mounted outside, just beyond where the PVC exits the rim joist and turns upward 5 . Building codes set minimum requirements with regard to location and height of the vent pipe in relation to the roof line and nearby openings into conditioned space. But local codes may vary so check with the building inspector for up-to-date specs.
Want to learn more? Here's how to retrofit a brick structure for repeated flooding.
A version of this article appeared on ProTradeCraft.com under the title “How to Install a Radon Mitigation System in a New Home.” Thanks to Niles Erickson and Andrew Ahlquist at Erickson Foundation Supportworks for their help updating the information for retrofits.
