How to Install Fake Beams Like a Pro
Every remodeling job is different, but a lot of what carpenters do on any job is stuff they’ve done before. When you know you’re going to be doing something over and over, you can both speed things up and maintain quality control by using a tried-and-true process, which often includes building a jig or making a template. The same is true when a single project calls for fabricating a large number of nearly identical assemblies.
That’s the subject in a series of videos by Matt Jackson, a master carpenter and YouTuber in Rapid City, South Dakota. His video “Install Fake Beams Like a Pro,” is one of the most popular on ProTradeCraft.com, and is available via a link to his YouTube channel on his Next Level Carpentry website.
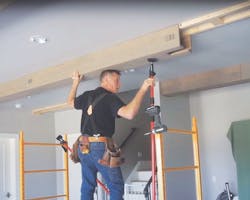
The project involves fabricating and installing faux beams running the length of a family room ceiling. To facilitate installation between walls, Jackson built each beam in three sections, simulating pegged mortise-and-tenon joints between them (a process featured in other videos in the series). We pick up the action near the end of the project, as Jackson dry-fits the faux beams.
In the 15 minutes it takes to watch the video, we learn not only about Jackson’s careful process, but also about the tools he uses while working overhead by himself with bulky beams, as well as some of the tricks that make the work go more smoothly.
Beveled Edges Ease the Fit
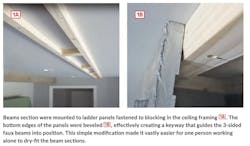
The three-sided boxes that make up each beam are about 8 inches on a side. They fit up against ladder panels [1] made from 2x4s ripped in half and spaced out with blocks about 3 feet on-center. The beam locations were laid out using a laser, and the panels were fastened with structural screws to blocking that had been installed in the ceiling before it was drywalled.
To accommodate the slightly out-of-square wall-ceiling joints created by the taped corner seams, Jackson needed to scribe the beam sections at either end. The process involves temporarily fastening the beam section in place, scribing, taking the beam section down and removing excess material at the scribed end, then reinstalling to check the fit. Given that he’d be handling the beams himself, Jackson needed something that, as he puts it, “… allows the beams to slip up into place without a fight ….”
His solution was to put a 22½-degree bevel on two edges of the 2x2s, then make sure while assembling and installing the ladder panels that the bevels were facing away from the ceiling. This effectively made the bottom edge of the ladder panels narrower than the beams, making it much easier to slide the beam sections in and out.
Making the Offset Scribe
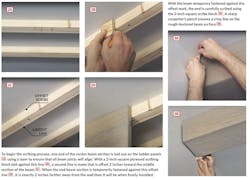
Although the faux beam boxes were all made using the same template for the simulated mortise-and-tenon joints, Jackson marked each of the three sections that make up a given beam to avoid accidental mixups. Middle sections were cut to final dimension, while end sections were marked left or right, and were cut to a little less than 2 inches longer than needed to allow for scribing. The first step in the scribing process is to use a laser to mark the ladder panels with the locations of all of the “mortised” ends of the center beam sections [2].
This not only ensures that all of the joints will align, but it also establishes a reference point for what Jackson calls an “offset scribe.” Next, Jackson makes a 2-inch-square scribing block, and uses it to mark a line on the ladder panel that is offset toward the middle section exactly two inches from the joint layout line. The final step before making the scribe is to fasten the end beam section temporarily to the ladder panel, with the end aligned against this offset mark. As Jackson explains, “This puts the beam in a temporary position that’s exactly two inches from where it’ll end up.”
Making and Milling the Scribe
Now the 2-inch-square block used to mark the offset becomes the block used to make the scribe. [3] “I’m using a carpenter’s pencil with a very sharp classic point on it,” Jackson tells us, “so that I can get a clean line on the rough texture of this beam.” (If you’re curious about what he means by a “classic point,” see his video “4 Ways to Sharpen a Carpenter’s Pencil.”) With all three sides scribed, the “very crisp scribe line” is now “precisely 2 inches from where the beam needs to be when it’s trimmed and fit against the wall.”
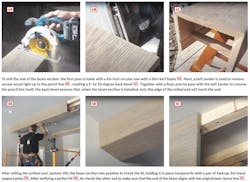
After removing the beam section to sawhorses, Jackson mills the scribed end in a three-step process [4]. First, he trims off all three sides of the beam using a 6½-inch circular saw with a thin-kerf blade. “The combination makes a very fine, accurate cut precisely where I want it,” Jackson explains. “And where I want it is just proud of the scribe pencil mark. It would be a major mistake to over-cut at this stage of the game.” In step two, he uses a 3x21-inch belt sander with a 36-grit zirconium oxide belt to remove the wood precisely up to the pencil scribe. He angles the sander to create a back-bevel of 5 or 10 degrees, which ensures that only the edge of the beam end will touch the wall, all but eliminating the odds of creating a visible gap. In the third step, he makes a final pass with the sander “with the precision that allows me to remove the pencil mark itself, no more no less.”
After drilling countersunk pilot holes on both sides of the beam, Jackson reinstalls the beam section to check the fit [5]. From the scaffold, he slides the beam over the ladder panels, and holds it there with a pair of Fastcap 3rd Hand support poles (see “Tools for Working Solo,” right), leaving enough slack to enable him to slide the beam against the wall to check the fit of the scribe. Happy with how everything fits, Jackson tightens up the poles, and drives a few trim screws to hold the beam section in place temporarily. Then he releases the support poles, and moves the scaffold to start work on the next beam section.
Rinse and Repeat
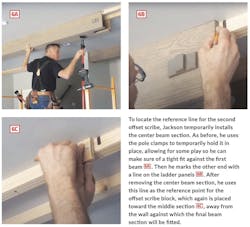
Scribing and fitting the beam section at the other end follows the same process, with a couple of notable exceptions. First, instead of using a measurement and a laser to mark the layout line that will serve as a reference for the offset scribe, Jackson temporarily installs the center beam section and scribes it [6]. Locating this line by scribing rather than measurement accomplishes two things: it ensures that the joint layouts will be consistent because all center beam sections are cut to exactly the same length; and because the center beam sections will be installed last, it all but guarantees that they will fit without needing to be modified.
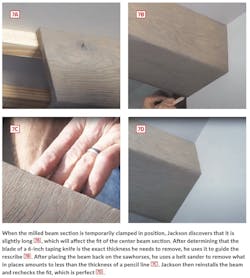
The other exception comes after scribing, milling, and test-fitting the end beam section. With the beam section temporarily installed flush to the wall, Jackson checks to see that the other end aligns with the layout line near the center of the ladder panel. What he discovers is that the beam is “ever so slightly too long,” which means that the center beam section won’t fit. Instead of free-handing the rescribe, he determines that the blade of a 6-inch joint knife is just the thickness he needs to remove, so he uses the knife to guide the scribe [7]. And even though the amount of wood that needed to be removed was less than the thickness of the pencil line in places, Jackson once again used the belt sander to do the final milling. Practice makes perfect.
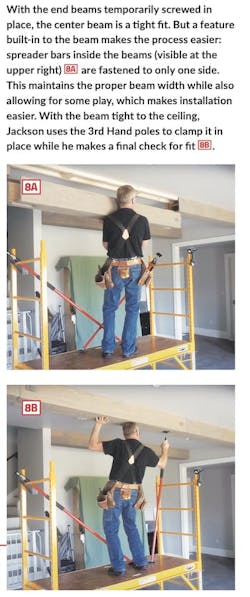
Now all that remains is to temporarily screw the end section in place, and install the center section to check for fit. Jackson admits that the tolerances are very tight, noting that “something as slight as a glob of faux finish on the end of the beam can prevent it from going into place.” He also admits that for this particular section it “would be nice to have a helper.” But we also learn that, in addition to the 3rd Hand clamps he’s been using and the bevel he’s added to the ladder panels, Jackson has one more trick up his sleeve to make solo installation easier. When building the beams, he installed several spreader bars at regular intervals to help hold the three-sides square to each other. But instead of fastening them to both sides, he fastened only one side, allowing for some play in the width of the beams where they meet the ceiling [8]. Like everything else about this well-planned project, this tactic came in handy when it counted.
That’s the process for scribing and fitting one three-section beam. After everything is temporarily screwed in place, Jackson takes everything down and transports it back to his shop. There he applies the final faux finish (a process he covers in another video), then carries everything back for final installation and touch up. Whew!
Tools for Working Solo
Jackson works alone on this job, which makes sense for the most part. But all the up and down handling of the oak beam sections would have been easier with a helper. To compensate, Jackson uses a couple of tools. First is the Werner SRS-72 6-Foot Steel Rolling Scaffold ($464 online) that Jackson stands on while installing and removing beam sections. The roomy platform adjusts in height by 2-inch increments, and supports up to 1,000 pounds. The scaffold moves easily on locking castors that swivel 360-degrees, and the whole thing will roll through a 30-inch doorway. It requires no tools for assembly and lies flat when broken down for easy transport.
Watching Jackson’s video makes clear how indispensable the pair of Fastcap 3rd Hand adjustable support poles ($70 online) are on a project like this. The telescoping poles come in a variety of lengths, and feature pump-jack and quick-release levers that can easily be operated with one hand. The poles come with a second top-mounted articulated foot equipped with a magnet for use when securing a sheet plastic dust barrier. I can think of a lot of jobs that would have been easier if I’d had a pair of these handy back in the day.
For links to many of the other tools and equipment Jackson uses in his videos, check out his NextLevelCarpentry website (nextlevelcarpentry.shop)
