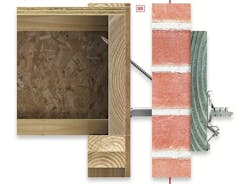
The most common cause of exterior deck collapse is failure of the connection between the ledger and the house. Most often, the fasteners fail by withdrawal, either because they were inadequate to begin with (e.g. nails) or because the house or deck framing fails due to rot from splashback or poor or missing flashing. The codes are catching up to the problem, and by now, most remodelers understand what needs to be done to keep the ledger dry and firmly attached to the structure.
At least they did until we started wrapping the building in several inches of rigid foam. The problem this creates is not new because attaching a ledger to a house clad in brick veneer presents the same challenges. Foam is perceptibly too insubstantial to support a beefy cantilevered through-bolt, but brick veneer seems so much more solid that many deck builders assume it can carry the load. It can’t, says Glenn Mathewson, but the reason is not what you think.
RELATED: Deck Flashing That Works
Mathewson is a Colorado carpenter-turned-building-inspector and a widely recognized code expert, especially as applied to exterior decks. In 2012 he launched BuildingCodeCollege.com, a treasure trove of code-related content that is well worth your time. (Most of the content is behind a paywall, but it’s up-to-date, reasonably priced, and often qualifies for CEU credit.) For
a preview, check out a video at ProTradeCraft.com titled “Deck Ledgers, Brick Veneers, Building Codes, and Common Sense: Do They Mix?” which is an excerpt from Mathewson’s online course, titled “Ledgers and Lateral Loads.”
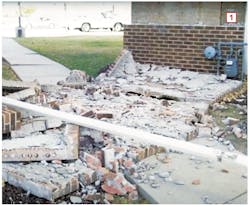
In the video, Mathewson notes that code prohibits supporting deck ledgers on brick veneer (2018 IRC, R703.8.3 and R507.9.1.1). Substantial as veneer brick may seem, it is installed with a minimum 1-inch airspace behind it, and the only resistance to its pulling away from the sheathing comes from metal brick ties, which can’t be seen in a retrofit and may not have been installed correctly or an insufficient number. Poorly constructed brick veneer can fail even when it’s carrying nothing more than its own weight [1].
Bottom line: Notwithstanding code, attaching a deck ledger directly to brick veneer is a risky business.
Mathewson provides this example of the catastrophic failure of a two-story veneer brick wall during a windstorm. Investigation revealed that not enough wire ties were used, but Mathewson notes that over time, general settling and cracks in the mortar can reduce the ability of brick ties to resist lateral loads.
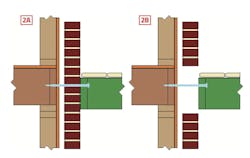
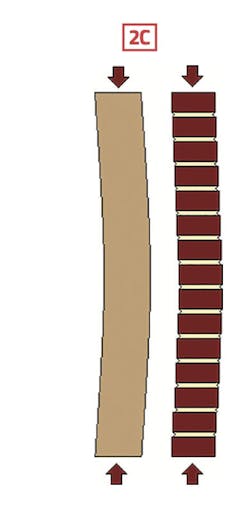
But contractors still ask Mathewson why they can’t lag or through-bolt into the rim joist beyond the brick. The answer is that cantilevering the connector like that still loads the brick [2]. It’s not the strength of brick in compression that condemns this type of connection to failure, Mathewson explains, but rather the lack of lateral resistance. As with an overly tall wood stud or column that is unsupported laterally, a vertical load can cause the column of brick to deform and, eventually, to fail, taking the deck with it.
Rigid exterior foam presents the same problem.
RELATED: Framing With Thick ZIPs
Foam sandwiched between a ledger and the rim joist or exterior wall framing will deform under a load it was not designed to bear. Over time, the cantilevered connectors can loosen and sag, or fail completely.
These illustrations are derived from those Mathewson uses to explain why a ledger fastened through brick veneer into the rim joist still exerts a vertical load on the brick. The connection looks solid enough [2A] until you imagine the brick is removed and the bolt is cantilevered 4 or more inches from the sheathing [2B]. It then becomes obvious that the brick is bearing a load that over time may cause even a through-bolt to sag and bend; a lag bolt may eventually withdraw completely. Either way, the deck is toast.
Flush the Ledger to the Foam
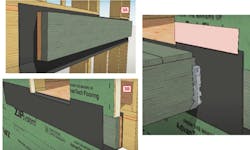
Fortunately, there are solutions. First up is an option for new construction presented in a ProTradeCraft.com video entitled “Weaving a Deck Ledger into a Wall with Thick ZIP Panels.” The detail, which is the brainchild of Michael Anschel and his team at Otogawa-Anschel Design+Build in Minneapolis, Minn., interrupts the foam with a ledger attached to the framing flush with the sheathing, where it becomes integrated into the water-resistive barrier [3].
In this case, the wall is sheathed with Huber’s ZIP System Insulated R-Sheathing, which combines an engineered structural panel with rigid insulation and an integral water-resistive barrier that, when sealed at the seams with ZIP System tape, also provides an air barrier. But the detail can be easily adapted to accommodate a system that uses furring strips over rigid foam applied to sheathing. A detail like this could also be adapted for retrofit in an exterior wall with continuous rigid insulation, but care would need to be taken when removing existing foam to limit damage to the water and air barriers and to repair those layers as necessary.
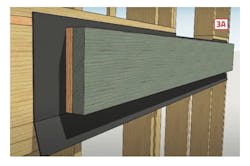
To protect the wall framing, a layer of peel-and-stick membrane is applied first, leaving a flap hanging with backing paper intact at the bottom that is about twice the thickness of the foam [3A]. The ledger is padded out to bring it flush with the insulated sheathing and fastened to the framing as required by code.
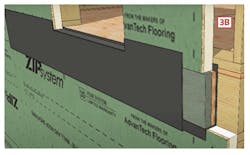
Insulated sheathing is then installed around the ledger, with the flap of peel-and-stick used to z-flash below the ledger, and a second strip of peel-and-stick is installed over top of the assembly to provide a continuous water and air barrier [3B].
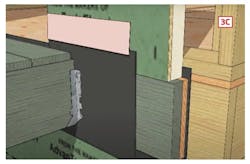
A strip of termination tape protects the upper edge of the membrane, after which the deck framing and siding can be installed [3C].
Deep Standoff Brackets
Another solution is to use brackets designed to hold the ledger away from the wall framing so that brick or foam can pass behind. Installation is easier in new construction, for obvious reasons, but the brackets can be used in a retrofit, provided care is taken to remove and replace brick or foam and reseal against water
and air intrusion.
Here are four standoff brackets that do basically the same thing, although some require inside access to the house framing.
(Prices shown are those listed at the company websites in March 2022 and don’t reflect sales tax, quantity discounts, or shipping charges.)
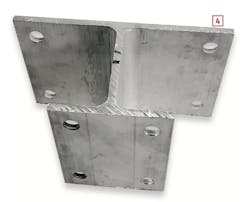
Maine Deck Bracket: The Maine Deck Bracket ($42 each) is the simplest example of a ledger standoff [4]. The 1⁄4-inch-thick aluminum extrusion resembles a 5-inch-long section of an asym- metrical I-beam. Both flanges are predrilled with 9⁄16-inch-diameter holes for 1⁄2-inch bolts that hold the wider 8-inch flange to the rim joist, and the ledger to the narrower 4-inch flange. The bracket holds the ledger 41⁄8 inches off the framing, enough for several inches of foam or a narrow wythe of veneer brick to pass behind.
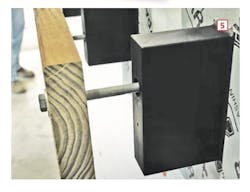
BR Brick Bracket: The BR Brick Bracket ($207.10 for a set of 10) is made of molded polymer with an aluminum insert. Installation of the single 1⁄2-inch through-bolt that supports both the 6x101⁄2x55⁄16- inch (WxHxD) bracket and the ledger requires access to the rim joist from inside. The bracket provides 43⁄4-inch clearance between the base and the ledger, and the off-center bolt-hole allows for staggered bolt layout by alternately rotating the bracket 180-degrees [5]. Installation instructions recommend using a template to mark all bolt locations, then using a guide to drill through the sheathing and rim joint to ensure proper alignment.
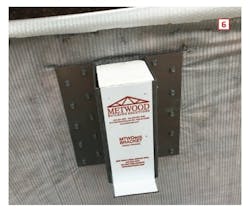
Metwood Deck Ledger Bracket: I first wrote about Metwood Building Solutions in an article (Innovative Products, PR/Dec. 2017) about the steel plates they manufacture to reinforce joists that have been weakened by notches or large openings cut for plumbing pipes or ductwork. The company’s Metwood Deck Ledger Bracket ($70 each, including fasteners) is a cold-formed, 10-gauge steel bracket that provides 43⁄4-inches of clearance between wall sheathing and a deck ledger [6]. Like a joist hanger on steroids, the bracket is fastened to the house framing with twenty 1⁄4x3-inch Simpson Strong-Drive SDS screws (provided), and the ledger is held to the bracket with six Simpson 1⁄4-20x21⁄2 Drill-Flex self-tapping structural fasteners (also provided). (The bracket is pre-punched for these as well, but I talked with Shawn Callahan at Metwood, who says hitting the holes isn’t necessary as long as you use all six screws.) The bracket includes a tab at the bottom that temporarily supports the ledger before it’s fastened, and a block of rigid insulation is glued into the bracket to reduce the thermal short. The bracket is engineered to be fastened to 3 inches of solid- sawn lumber (rim joist plus blocking) that bears on a sill or wall plate, but according to Callahan, if you don’t have access to the house framing, Metwood will help you adjust the number and spacing of the brackets to accommodate existing conditions.
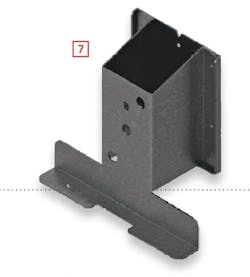
H1-Series Deck Ledger Bracket: This bracket [7] from HDG Engineered Products is part of a system designed to handle not just ledgers, but a variety of deck connections, including post-to- footing, post-to-joist, ledger-joist corners, and knee braces. The cold-formed, 12-gauge steel brackets come in Queen and King sizes ($75 and $80 each), which provide 4- or 5-inch clearance, respectively, between the bracket flange and the ledger.
The bracket provides three holes that serve as drill guides and allow for staggering of the single 5⁄8-inch through-bolt that supports both the bracket and the ledger. Installation requires inside access to the house’s floor framing, and the bolts are typically fed from behind the rim joist to enable the addition of other hardware in the series, such as corner connectors. The hot-dipped galvanized version has a plain black finish, but a natural finish stainless version is also available, as are custom finishes in polished stainless steel, smooth powder coated, and textured epoxy. Heavier-gauge plate steel brackets are also available by special order.
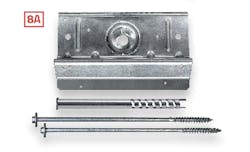
The BVLZ system has four components [8A]: a 9½x5⅝-inch steel connector plate that is fastened to the ledger plate with short structural screws; two 14-inch-long structural screws that are driven at an upward angle of 40-degrees into the rim joist to support the connector plate [8B]; and a compression strut that threads into the plate until it butts against the wall sheathing, which keeps the load from the ledger off the brick by transferring it to the rim joist.
A New Angle on Retrofits
If the thought of removing and replacing brick makes your head hurt, you can make the ledger connection using the BVLZ Brick Veneer Ledger Connector system from Simpson Strong-Tie ($159 pkg of 4) [8]. The system, which can be installed entirely from the exterior, has four components: two 14-inch SDWH Timber-Hex HDG screws that support a 9½x5⅝-inch (WxH) 12-gauge steel ledger connector plate and an adjustable steel compression strut that transfers the load to the rim joist. The package includes all fasteners, plus a template used to locate the three 1⅛-inch holes that need to be drilled in both the brick and the ledger: one straight through for the compression strut; and two at a 40-degree angle for the long structural screws.
The BVLZ was designed and tested for use with brick veneer and has strict installation requirements, including minimums and maximums for the distance between the ledger and the house framing or sheathing. While the BVLZ hasn’t yet been tested for use with rigid exterior foam, as long as these requirements are met, I think it would work.
About the Author
Sal Alfano
Executive Editor
Sal Alfano is executive editor for Professional Remodeler. [email protected], 202.365.9070
