The Right Way to Light a Kitchen
All illustrations: Doug Walter
For too many years, the advice about kitchen lighting given by people who should know better has been to place the can lights out in the aisles of the kitchen. This looks nice on the plans, but it keeps the people working in the kitchen in the dark.
I prefer to locate can lights closer to the upper cabinets, where they deliver three or four times as many foot-candles to the work surface. That’s not a guess—I’ve measured it both ways.
Unfortunately, the old theories are still being taught these days. But now you know there’s a better way.
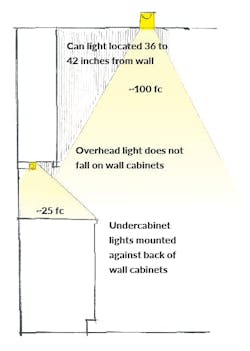
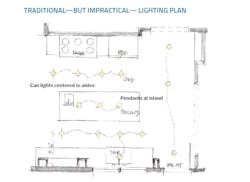
Just last year I attended an industry event at a lighting showroom where a representative from a major lighting manufacturer recommended lighting kitchens based on a sketch like the one at right. The reasoning here is that the overhead light should not hit the upper cabinets (horrors!), but should neatly fall just below them, where it joins with the undercabinet lighting to bathe the counter with a workable number of foot-candles (fc).
B. ... Until you add people
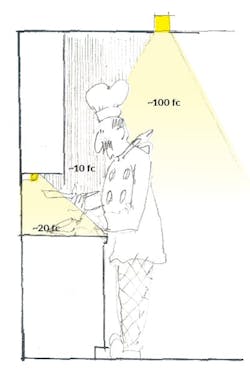
It’s a great idea … until you add people. Standing at the counter, the back of the cook’s head gets 100 foot-candles while he or she works in his or her own shadow. This scheme also assumes that the kitchen is equipped with undercabinet lights and that you always use them—maybe even as primary task lighting. But that’s not how most of my clients use their undercabinet lights. Often the only lights they turn on are the ceiling can lights.
C. A better way
Most kitchen lighting plans locate ceiling can lights near the middle of the walkways between counters (see “Traditional—But Impractical—Lighting Plan,” below). As we’ve seen, this means working in your shadow at the counter.
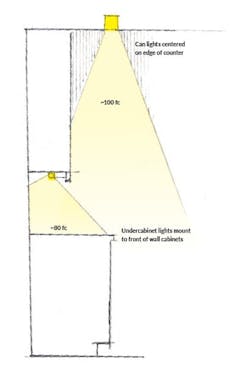
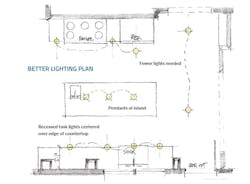
For years I’ve advocated placing ceiling cans 24 to 26 inches out from the wall, which puts the center of the beam right over the edge of the countertop. Yes, it creates scallops of light on the upper cabinets, but if you’re making such a serious investment in cabinets, I think it’s nice to be able to see them.
D. Fewer lights, more light
With cans placed closer to the uppers, not only is there more direct task light on the counter, there’s less need for cans in the walkways because light bouncing from the work surfaces will be more than enough (see “Better Lighting Plan,” below).
In fact, with kitchen lighting, you’re not after uniform light levels such as you’d design for an open office plan. You want effective task and decorative ambient lighting. Don’t be afraid of dark areas; they make the light areas that much more effective.
Properly layered kitchen lighting includes not only recessed can and undercabinet task lighting, but some decorative pendants or a chandelier as well. You may also consider including indirect up-lighting on top of the upper cabinets or in a ceiling cove. These options give the homeowner the ability to choose from a number of lighting effects, depending on mood and activity.
How Much Light Is Enough?
The Illuminating Engineering Society of North America (IESNA) issues recommended lighting levels for various rooms and activities. For food prep tasks—so-called “common visual tasks,” defined as “visual tasks of high contrast and small size, or ... low contrast and large size”—IESNA
recommends 50 foot-candles, and twice that for users older than 65.
Most kitchens offer far less than these recommended levels, partly because of where the task lighting is located, but more often due to use of the wrong lamp in the fixture. Most bulb packaging lists lumens, which is a measure of bulb capacity; foot-candles measure the actual amount of light the bulb delivers. That isn’t listed on the packaging, but you can look up the values on manufacturer websites.
Better yet, use a light-metering app on your smartphone to measure actual foot-candles at various locations in a room. A number of free and paid apps are available for both iOS and Android devices. If you use an app or meter that measures lux, just divide by 10 to get foot-candles.
