Concrete Stair Retrofit
This project came about because an electrical meter at the top of the exterior concrete stairs didn’t have the required 3 feet of standing space in front of it. Our solution was to extend the top landing 18 inches and form new treads and risers right over the existing stair, which was sandwiched between the stucco wall of the house and a masonry retaining wall. Total width of the stairs was a little more than 4 feet, with 12-inch-deep treads and a 7¼-inch rise. For forms, we ripped 2x8s to 7 inches, which would provide a gentle slope on the treads for positive drainage.
Layout
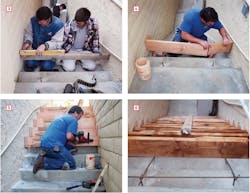
I started the layout at the top of the stairs, using a level to extend a horizontal line on the stucco wall to mark the new location of the extended landing [1]. After marking a point 18 inches out from the existing landing, I struck a plumb line to mark the location of the first riser, then measured down 7¼ inches and struck a level horizontal line to mark the top tread. On that line, I marked the tread depth at 12 inches, and dropped another plumb line for the second riser, [2] then repeated the process for each tread and riser all the way to the bottom of the stair.
Next, we marked locations for rebar about a quarter of the distance in from each end of the treads. My son, Tyler, drilled ⅜-inch pilot holes, then drove 8-inch-long steel dowels about 4 inches deep into the existing treads. These will eventually be used to tie rebar in both directions.
While Tyler worked on the rebar pins, I got some help from my other son, Tim, transferring the layout of each tread to the opposite wall. After leveling across at each tread, I measured and marked the layout using the same process as before. [3]
Setting the Forms
With no way to use stakes to hold the risers in position, we ripped 7x7-inch plywood brackets and attached them to the ends of each 2-by riser. These would be fastened to the walls on either side with 5/16-inch-diameter Tapcons to hold the forms in place. On the stucco wall, we were careful to use screws that would penetrate no more than ¾-inch—long enough to hold the forms in place, but short enough to avoid damaging the drainage paper behind the stucco.
The ¾-inch-thick plywood brackets also saved on lumber: With a stair width of about 49½ inches, we were able to cut 12-foot-long 2x8s into three 48-inch pieces, and the plywood attached to each end made up the other 1½ inches.
We fastened the brackets to both ends of each 2x8 riser form, then cut the riser into two pieces. This solves two problems caused by the fact that the stairs are sandwiched between walls on both sides. First, when setting the forms, it makes it easier to jockey them into position [4]. Once we have them where we want them, we hold them together with a gusset made from wooden stakes screwed over the joint on the outside of the form [5].
The other problem this split-form solves appears after the concrete is poured, when we can remove the gussets and strip the forms without damaging the still-wet concrete.
To avoid having to change bits, we used three drills: a hammer drill to predrill the block wall, a cordless drill to predrill the stucco, and a second cordless to drive the Tapcons.
A 2-by runner down the middle of the forms provides both bracing and a place to stand while floating the concrete [6]. The final step before the pour is to tie rebar to the steel dowels in both directions and use a rag to rub release oil onto the forms (the used motor oil I save from my truck works well for this purpose).
Placing and Finishing
The morning of the pour, I used an inexpensive pump-up sprayer to apply QuickCrete Concrete Bonding Adhesive to the existing concrete stair and the rebar, being careful not to spray any on the forms. For this stair we used a pump to place 3,000 psi concrete at about a 4-inch slump into the forms. I added fibermesh to the mix and because the stair is located on a side of the house that gets lots of wind with no sun, I also added 1% polar set to help speed curing in cooler temperatures.
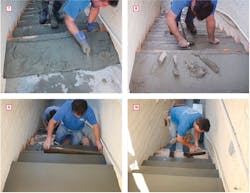
I floated each tread, starting at the bottom and working my way up the stair [7]. As the concrete began to firm up, I started at the bottom again, removing excess concrete and using a 12-inch square trowel to smooth and shape the tread surface, making sure to slip the trowel underneath each riser [8]. I also used a hand edger to define the nosing where the tread meets the form.
When the concrete was ready for finishing, Tyler removed the screws from the gussets and brackets, starting at the top and working down. I followed, removing the forms and, working from knee-boards on one tread at a time, and using a ½-inch cove tool to finish the inside corner and a ½-inch edger to finish the nosing [9].
The final step was to make a second pass with a broom to create a nonslip surface [10].
Get more Jobsite Know-How here
This article was adapted from the video “How to Build and Pour Concrete Stairs”; an early version by David Frane first appeared on Protradecraft.com.


