How To Build Rot-Resistant Deck Beams
The most troublesome spot is the deck ledger, and we’ve featured a number of videos that discuss the best way to flash this connection to keep water away and allow for drying. Although deck support beams deserve the same attention, they don’t always get it. One exception is a video from Steve Maxwell, a home improvement contractor in Manitoulin Island, Ontario, Canada.
The Problem
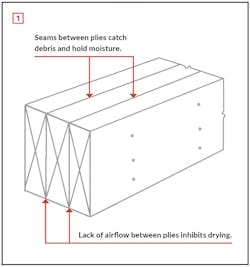
Most contractors use composite beams, nailing or bolting together two or three pressure-treated (PT) 2-bys on site [1]. Though plenty strong, the joint between members catches and holds water, so it takes longer for the wood to dry out. The seams also catch particles of sawdust, dirt, and debris that can further hinder drying.
The Solution
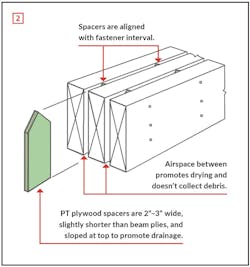
Maxwell’s solution is to separate the individual members of a composite beam with spacers sized to match the full depth of the beam [2]. He typically cuts 2- to 3-inch-wide spacers from ½-inch PT plywood, but notes that composite material could also be used. The top of each spacer is cut at an angle, creating sloped edges that promote drainage.
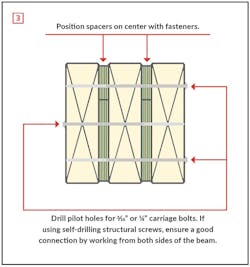
Maxwell places the spacers at approximately 24 inches on-center, which corresponds to the fastener spacing interval. He recommends using carriage bolts instead of nails because they do a better job of drawing the “sandwich” together [3]. He doesn’t say what diameter he uses, but ¼-inch bolts are larger than the 20d or 30d nails that would otherwise be used. If you like to use washer-head structural screws for built-up beams, they will work in this case as well. However, unlike bolts, with screws you will be better able to draw the individual 2-bys together if you work from both sides.
These days, many deck builders solve the moisture problem by capping beams—and sometimes the joists as well—with peel-and-stick tape. Depending on the size of the deck, this can get expensive in both material and labor, but it’s a good solution for flush beams and complex framing intersections. A combination of tape and spacers might be a good compromise solution.
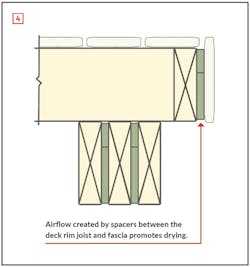
One place spacers clearly make sense is at the perimeter of a deck between the rim joist and the fascia [4]. The airspace created keeps debris from collecting and promotes drying by allowing for air movement.
