How To Retrofit Brick Structures for Repeated Flooding
It wasn’t the first time those areas have had to rebuild after hurricane flooding and it won’t be the last. (Hurricane records show that, on average, a tropical cyclone makes landfall somewhere on the Texas coastline three times every four years, and that any 50-mile segment of Texas coastline is hit by a hurricane about once every six years.) So why do we not have a method of rebuilding that anticipates future flooding and is designed to require cleaning and drying but not total replacement of flooded building materials?
In the aftermath of Hurricane Harvey, Dr. Joseph Lstiburek, co-founder of Building Science Corporation, posed and answered that question in an article titled “BSI-101: Rebuilding Houston.” Subsequently, Dan Morrison, chief editor of ProTradeCraft.com, collaborated with Lstiburek on a video animation. I’ve drawn on both sources to adapt the animation here.
Demo, Dry, and Disinfect
The first step in floodwater cleanup is the same everywhere: Tear out and discard damaged material, including drywall and sheathing. That’s because unlike interior materials saturated by clean rain water, materials submerged in flood water absorb a variety of potentially toxic chemical and biological substances. Rain-soaked materials can be dried (although, as Lstiburek notes, to avoid mold growth, drying should be done within a few days), but most flood-damaged materials should be completely removed. “When in doubt, throw it out,” Lstiburek says.Repairs often include sections of wall sheathing and siding, but Lstibruek’s article focuses on houses with brick veneer because they pose a special problem. Removing flood-soaked drywall, insulation, and sheathing exposes the brick, which is a good thing because it allows for drying and disinfecting. But how do you put the wall back together so that it not only performs as intended but also resists damage from future flooding?
Weep Holes and Waterproofing
The first step in Lstiburek’s approach to the repair is to ensure that in a future storm any rain water that makes its way through brick can drain to the bottom of the wall and escape to daylight. That means cleaning out mortar droppings from the channel at the bottom of the wall, between the framing and the brick. The goal, Lstiburek writes, is to “completely expose the concrete in the seat of the slab edge of the foundation.” That means cutting out the flashing, too, which was probably damaged when the sheathing was removed and now will only get in the way. Next, working from the outside, drill weep holes at every other vertical joint in the bottom course of brick and plug with a commercially-made insect shield.
Drainage Plane
The next step is to create a drainage plane behind the brick that will direct any water that makes it through the cladding to the weep holes at the bottom of the wall. Lstiburek proposes two methods.The first one involves installing thin (¼- or ⅜-inch-thick) sheets of flexible XPS foam between the bricks and stud walls. The foam is lapped, shingle style, to promote drainage, and is temporarily held in place with foam wedges until spray foam insulation is applied. Details are available in Lstiburek’s article, but I’m glossing this method here because, although it minimizes the amount of spray foam needed, the thin foam may not be readily available and could be difficult to work with, particularly if the space between the studs and the brick is an inch or less.
This solution also requires removing the wall ties. In a footnote, Lstiburek says they “never did anything anyway except catch mortar droppings and rust out,” and claims that a one-story structure “never needed ties in the first place.” Your building inspector might not agree, however, so be sure to ask before you go in this direction.
The other method involves placing drainage mesh against the brick with the filter fabric facing toward the interior. Not only does this alternative seem more likely to be installed properly on a typical jobsite, but one variation of it allows you to retain the existing wall ties or, more likely, retrofit with anchoring hardware made for the purpose. I’ve never had to remove sheathing from the inside while preserving wall ties (and Lstiburek doesn’t address how to go about it), but I can imagine ways to do it that require care but would work. With sheathing that was never under water (on the upper half of the wall, for example), you could carefully cut out each bay with a recip saw, leaving wall ties securely in place. Where water-logged sheathing is removed, it may be possible to refasten existing wall ties to the sides of the studs. However, I agree with a comment Lstiburek made: “Preserving existing wall ties is pretty much a waste of time.” Amen.
Much better is to retrofit new anchors that are designed to be fastened to the sides of the studs (more on this later).
Lstiburek describes two methods for installing the drainage mesh. Most mesh comes in 3- to 4-foot-wide rolls, so if you don’t need to keep the wall ties, lay the mesh horizontally, lapping successive layers shingle-style so water will drain to the exterior.
But if you want to retain or retrofit the wall ties, or if there isn’t enough room between the studs and the brick for the drainage mesh, install the mesh vertically in each stud bay . In this case, however, you should waterproof the brick side of the studs with liquid flashing, being careful not to overlap too much onto the sides of the studs, which need to be clean to promote a strong bond with the spray foam.
The drawing here departs from Lstiburek’s original by showing three treatments for wall ties. One leaves existing wall ties fastened to the studs through strips of sheathing left in place after cutting undamaged sheathing out from between studs. The other two use examples of alternative types of retrofit wall ties designed to be fastened to the sides of the studs .
Spray-Foam Insulation
Whether you use XPS or drainage mesh, the final step is to install closed-cell, 2-pound-density polyurethane spray foam. The foam should be a minimum of 3 inches thick within the stud bays, which means the total thickness will be a little more than that in the drainage mesh solution. After the foam cures, everythingLstiburek specifies closed-cell because, at the specified thickness, it provides racking resistance to a wall that no longer has any structural sheathing.
Equally important―and critical to the whole reason he cooked up these solutions in the first place―closed cell does not absorb water. “When the next flood comes … and it will come,” writes Lstiburek, “we throw away the interior gypsum board, but now we just have to wash, rinse, and dry the painted surface.”
Windows and Doors
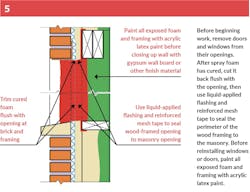
At wall penetrations, the water control layer needs to be connected to the opening , so windows and doors should be removed, then reinstalled after the flashing work is completed. Lstiburek recommends using liquid-applied flashing reinforced with mesh tape. If you use the XPS solution, seal the exterior face of the XPS to opening, which can be done from the outside. If you used the mesh approach, after the spray foam insulation has cured, trim it around the openings and seal it to the openings with liquid-applied flashing.
This article is adapted from the animation “Retrofitting for Repeated Flooding: Brick Wall with Spray Foam and Drainage Mesh,” which is the result of a collaboration between Dan Morrison of ProTradeCraft.com and Building Science Corporation based on an article by Dr. Joseph Lstiburek entitled, “BSI-101: Rebuilding Houston.” Lstiburek holds a Bachelor of Applied Science in Mechanical Engineering, a Master of Engineering in Civil Engineering, and a Doctor of Philosophy (Ph.D.) in Building Science. Since founding BSC in 1990 with his business partner, Betsy Pettit, he has been a key figure in establishing it as one of the most influential, innovative, and respected building science firms in North America.


