In a previous article, we looked at two rainscreens used in the unique exterior treatment for a whole-house remodel that is the subject of ProTradeCraft.com’s 13-part video series, “Building Resilience.” In this follow-up, we focus on installation details for the two types of PVC cladding matched to the two rainscreens.
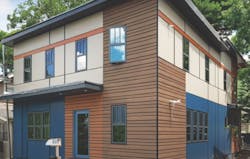
To recap the earlier article, bulk water is managed by two different types of cladding, horizontal PVC boards and large PVC panels, which are applied in patterns that break up the building’s mass into a “balanced asymmetry.” Both claddings are “open,” meaning they deliberately create space between and behind components that lets both water and air get in and out from behind the siding. The system ultimately relies on the water resistive barrier (WRB) to keep water out of the structure, but its durability relies on the generous ventilation provided by the rainscreens and the open-joint cladding, which make for extremely fast drainage and plenty of airflow to promote drying.
All good in theory, but as always, success depends on the details. Huber’s Zip-System R-12 sheathing provided the WRB, and two Benjamin Obdyke products took care of the rainscreens. For the cladding itself, Michael Anschel, president of OA Design+Build+Architecture, which designed and built the project, chose two products from Azek, ¾-inch PVC panels with PaintPro Technology, and TimberTech Azek Decking, a 100% polymer product.
Why Should Remodelers Consider PVC Siding?
“I’m supposed to be the green guy who hates PVC,” says Anschel, “and now I’m putting it all over the house. What’s going on with that?”
What’s going on is a lot of thinking and research, after which Anschel, who has always had reservations about the aesthetics of vinyl siding, changed his opinion of PVC as a category of material. “It used to be easier to be broadly dismissive of the material,” he says, “but, in fact, the formulas and applications differ. The sweeping generality of ‘PVC bad, wood good’ is pretty out of date.” While materials like brick, stucco, and wood still look and feel good, he says, the first two have high environmental impact, and over time they all deteriorate and require maintenance. On this project, water-management issues are addressed with the WRB, rainscreens, and flashing, Anschel says, so it makes sense to use cladding that will “easily” last for 100 or 200 years. “PVC will last as long as this house. It’s impervious to moisture and rot … it’s not going anywhere. And here’s a really cool thing: If we decide to replace it, the company that makes it also recycles it.”
What about expansion and contraction? The episode 10 video includes excerpts from a Zoom conference call with the technical team at Azek, in which we learn that contraction creates more issues than expansion. “When we see problems,” says Dave Parker, Product Manager for Azek’s trim and molding products, “it’s typically when people installed [PVC trim] in the wintertime, left gaps, it expanded out like it was supposed to that first summer, then it got cold again, and when it went from winter to summer, it never grew back out to its full length.” The same thing happens with PVC decking and panels.
Water is managed by the WRB, rainscreens and flashing, so it makes sense to use cladding that will last 100 or 200 years.
The solution is proper installation, Parker says: “You can constrain the expansion of the product, but you can’t stop the shrinkage, so we would always tell you to install the products tight.” Even then, how you fasten it is critical. “The first thing is to … make sure you’ve got the right number of fasteners in it,” Parker says. “The second thing is … wherever you’re butting ends of PVC trim, glue those joints.”
We’ll see in a moment how the PVC cladding was fastened, but that still leaves the question of how to trim openings, inside and outside corners, and transitions between panels and deck boards. The solution was a set of one- and two-piece extruded aluminum profiles from Tamlyn called “XtremeTrim” that frame these transitions with a series of clean lines that accentuate the geometry of the siding patterns while also protecting edges and promoting drainage. Here’s how it all went together.
Foundation Protection Panels for Cladding Installation
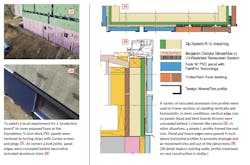
A new block wall foundation at an addition to the back of the house was insulated on the exterior to R-15 with 3-inch-thick XPS rigid foam glued to the block, from the top of the wall down to the footings. (This exceeds local code for requirements for interior and exterior foundation insulation and drainage.) At the existing foundation, some of which was already insulated from the inside, rigid foam was also glued to the exterior, but only to around 16 inches below grade. Local code requires that exterior foundation insulation must be covered with a “protection board” above grade. The code doesn’t specify the material, but the ¾-inch-thick PVC panels fit the bill.
To support the PVC panels, ½-thick wood furring strips were either glued to the foam or mechanically fastened to the foundation. “I don’t love having wood in that part of the assembly,” says Anschel, “and I’d like to find a better way to attach the PVC … instead of relying on furring strips.” This was the first time Anschel used PVC panels in this application, but they worked so well he’s planning to make them his standard. “It’s rated for ground contact, it’s aesthetically pleasing, and it’s easy to install and, if need be, to replace.”
The PVC panels were then screwed to the furring strips using Cortex fasteners and plugs. (All of the panels and plugs for the project were painted before installation by an off-site finishing shop.) Installers completed one elevation at a time, starting with an outside corner trim profile that is fastened to the sheathing and captures the edge of first PVC panel. Butt joints are laid out to fall between furring strips, so trim profiles are held in place by the friction fit to panel edges and by the backfill. Any shrinkage is concealed by the aluminum trim channels.
Working on an exterior remodel? Identify the weak links in your soffit installation.
Cladding Installation Techniques and Tricks
As mentioned earlier, the unique cladding treatment is a “balanced asymmetry” achieved by a mix of solid PVC panels and horizontal PVC boards in several patterns and colors, framed by black aluminum trim profiles. Because the narrow trim profiles often spanned two types of cladding and multiple wall openings, care was paid to elevation drawings prior to framing to ensure rough openings were aligned both horizontally and vertically where required. Although window installation was typical, because the narrow aluminum trims provide less wiggle room, alignment tolerances were more critical than what is required when conventional window trim has to align across several openings.
With window and door jambs sealed to the WRB with tape, and rainscreens in place, cladding and trims were installed together in sections, one elevation at a time, starting at the bottom at one corner and proceeding to the other side and up, depending on the cladding configuration. Installers frequently consulted elevation drawings and a detailed trim schedule to determine which profiles went where. Nearly a dozen different profiles were used to handle inside and outside corners, window and door penetrations, joints between panels, and intersections of panels and open-joint board cladding.
The shape and location of the profiles determined the installation sequence. In general, trims were installed first, beginning with a drip-edge-like profile that established the bottom of the wall. The first “course” of cladding, whether panels or boards, was installed ½-inch above this trim piece to promote drainage and airflow. The aluminum trims don’t carry any weight, so each piece required only a few stainless steel siding nails to hold them in position until the cladding was fastened in place. PVC panels were fastened over the SlickerMax rainscreen using Cortex screws and plugs . “Our fastening base is that ZIP System R-12, that 7⁄16-inch OSB.” Anschel says. “We’re not going back and looking for studs. That’s huge. The fact that we don’t have to hit furring strips is a lot more forgiving in terms of where the screws land. And because all of the screws are plugged, you can’t see the them, so we don’t have to go through and mark precisely where the screws go.”
Trim channels conceal the top and side edges of most of the PVC panels, allowing for slightly imperfect cuts, and attention was paid to proper fastening to minimize temperature-related movement in the PVC panels. “Pinning the edges is the most important thing,” Anschel says, “so it’s a 12-inch pattern around the perimeter and 16 inches in the field.”
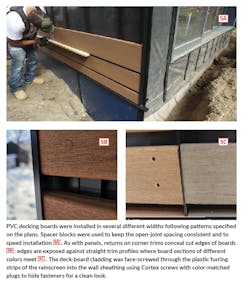
Sections receiving PVC deck boards were installed over the Benjamin Obdyke UV rainscreen system following a similar process. Returns in the aluminum trims concealed end cuts, and boards were fastened securely to the sheathing to control movement, with two or three Cortex screws at each end (depending on board width), and two in the field at batten locations.
Getting Hosed to Test Cladding Against Driving Rainstorm
This system isn’t inexpensive, in time or materials, but Anschel thinks it’s worth the initial investment if it lasts as long as he expects it to. Time will tell just how long that is, and it may well be that Anschel’s great-great-grandchildren will be the first to be able to do the math. But he doesn’t really want to wait that long, so toward the end ofPainting PVC with Dark Colors
If you’re like me, looking at that dark blue paint on all those PVC panels makes you wonder why they won’t swell like a cupcake in the oven during the summer. As we discover near the end of episode 11 of ProTradeCraft.com’s Building Resilience series (“PVC Cladding Panels and Metal Profiles Complete the Modern Makeover”) in an excerpt from a Zoom meeting with Azek’s technical experts, the answer boils down to two things: “hot” is relative, and the kind of paint you use matters.
“It’s all about heat build,” says Dave Parker, Product Manager for Azek’s trim and molding products. “Essentially, if the core of the product only sees 120 degrees … it could be 200 years and you’d never see enough shrinkage with the naked eye … even though that product is shrinking over time.”
But as soon as the core temperature reaches about 140°F, parker says, the PVC begins to distort. Consequently, the paint requirements for Azek’s PaintPro panels are designed to limit heat build so the panel core temperature doesn’t get too hot.
So how do you limit heat build? Azek’s requirements allow for three types of paint, depending on how light or dark the desired color is. For lighter colors, look for 100% acrylic latex paint with a Light Reflective Value (LRV) above 55. “There is enough sunlight reflected off those lighter colors, Parker says, “that it doesn’t get to the heat-build temperatures that we don’t want to see.”
For medium and some dark colors, Park says, in vinyl-safe colors, i.e., colors from which two pigments― raw umber and black―have been removed. “Those are obviously the two pigments that produce the greatest amount of heat-build,” Parker says, “so they remove [them] and replace them with other pigments to get the same color.”
The dark blue used on Anschel’s project is made AquaSurTech and falls into a third category: water-based solar reflective coatings. “They have the ability to make black paint with similar heat-builds to coatings with LRVs of 55 or greater,” Parker says, “by putting additives in that coating that actually reflect the sunlight away from it, so it doesn’t absorb that heat.”
This article is adapted from two episodes in the 13-part “Building Resilience” series at ProTradeCraft.com: “(10): Open Cladding That Lasts: Deck the Walls!” and “(11): PVC Cladding Panels and Metal Profiles Complete the Modern Makeover.”
About the Author
Sal Alfano
Executive Editor
Sal Alfano is executive editor for Professional Remodeler. [email protected], 202.365.9070


