How to Make Cutting Crown Easier With Proper Setup and This Jig
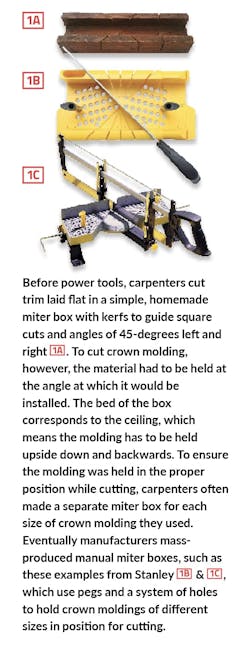
Before there were power saws, handsaws ruled. For trim work, carpenters built a wood miter box, which typically had three vertical kerfs, one for square cuts, and one each for angles of 45-degrees, left and right [1]. To cut simple miters, the molding was placed flat on the bed of the box and the cut made using the appropriate kerf as a guide.
To cut compound miters, such as those needed for crown molding, the molding was held, not flat, but at a precise angle against one side of the box. While many smaller molding profiles can be cut while being held against the near side of the miter box, most handsaws cut on the push stroke, so it’s much easier to hold larger moldings firmly in place on the far side of the box while sawing. In this configuration, the bed of the miter box corresponds to the ceiling and the fence to the wall, which means that, from the point of view of the carpenter, the molding is upside down and backwards [2].
Power miter saws made sawing easier, but with only one fence, the process of holding the molding upside down and backwards didn’t change until compound miter saws (both sliding and fixed) appeared on the scene. With these tools, rotating the bed of the saw still set the miter angle, but now you could tilt the blade to the proper bevel angle, making it possible to cut crown molding by laying it flat (and “right-side-up”) on the saw table.
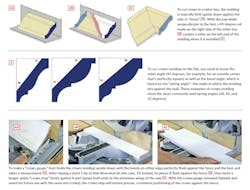
But there was a catch: In addition to knowing the miter angle (45 degrees, for example, for a perfectly square corner), carpenters also needed to know the bevel angle of the blade. This angle changes for different crown molding profiles, and is based on the “spring angle”―the angle the crown molding makes against the wall. Although you can find many crown molding configurations, especially when matching older or custom moldings, the most commonly used crown moldings have spring angles of 38 or 45 (and occasionally 52) degrees [3]. (These are commonly listed in molding catalogs as 38/52, 45/45, and 52/38). Many compound miter saws now come with detents for common miter angles as well as special markings on the bevel gauge for common spring angles. Printed tables are also available online, as are several digital calculators, such as the “Crown Moulding Angle Generator,” which takes user input for the spring angle and wall angles (from zero to 179.9 degrees) to calculate the miter and bevel angles for the saw blade.
If you have a compound miter saw, there are plenty of articles and videos to show you exactly how to go about cutting crown on the flat. But if all you have is a power miter or chop saw, you’re essentially using a fancy one-sided miter box. That’s why a page on ProTradeCraft.com with a video by Paul Ricalde entitled “Jig for Cutting Crown Molding Right-Side Up” caught my attention. A couple of links in the article also led to a saw set-up video from Gary Katz. Both help with issues around holding the crown in position against the fence, and with keeping track of up, down, left, and right while making crown cuts.
Tips for Saw Setup
Katz (garymkatz.com) is a well-known trade author, finish carpentry specialist, and founder of the Katz Roadshow, a traveling clinic covering all aspects of residential carpentry. A link to another Katz site, ThisIsCarpentry.com, led me to a series on crown molding, including a video called “Installing Crown Molding: Saw Setup.” It’s well worth watching all 12 minutes, which include an explanation of what’s really going on when you turn the molding upside down, plus instructions for making a handy “crown holder” to help with installation. But I want to focus here on what Katz calls a “crown stop,” which he uses to hold crown molding in a precise position against the fence of his miter saw.
Each spring angle holds the crown a specific distance from the wall, and, as Katz explains, when you flip crown molding upside down, this distance corresponds to the distance measured along the bed between the edge of the crown and the fence. With the saw blade set to vertical (no bevel), the key to making precise compound miter cuts is to hold successive pieces of crown molding exactly the same distance away from the fence. To ensure this, Katz rips a short length of 1-by stock he calls a “crown gauge,” then uses it to position a continuous “crown stop” exactly parallel to the saw’s fence [4]. With the crown stop clamped to the full extension wings of his saw and the crown gauge removed, he can make repeated cuts on multiple pieces of crown with the certainty that they are all positioned against the fence at the proper angle.
Rightside-Up Jig
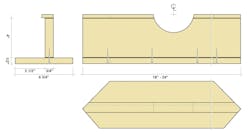
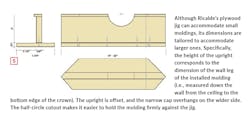
At last we get to the ProTradeCraft article that got me started down this road. It’s based on an episode from Paul’s Toolbox, the YouTube channel of New Orleans fireman and home improvement contractor Paul Ricalde, whose hands-on carpentry tips and tool reviews are aimed mostly at beginners, but are often useful for pros. At first glance, Ricalde’s title for the video, “Cut Crown as Easy as Base Molding,” would lead you to conclude that it’s about cutting crown on the flat. It’s not, which is why the ProTradeCraft title is “Jig for Cutting Crown Molding Right-Side Up.” Even that is a bit misleading because the top side of the crown molding is still resting on the bed of the saw, but the jig creates a fence opposite the fence on the power saw (like the near side of a classic wood miter box), which means that when the user looks down at the piece being cut, the right side is on the right and the left side is on the left. Looking down at the molding on the saw is, in effect, just like looking up at the molding once it’s on the ceiling.Ricalde’s jig is 18 to 24 inches long, made from finished plywood (I think Baltic birch would work well), ½-inch-thick for the base and ¾-inch-thick for the upright [5]. The upright piece is 4 inches high, which is the exact dimension of the wall- or spring-angle-leg of the large crown molding that Ricalde is cutting in the video (measured from the corner of the ceiling down the wall to the bottom edge of the crown molding). The upright sits slightly offset from the center of the base, which makes the jig reversible: the larger molding fits on the wider side, and smaller moldings can be cut on the narrower side. The thin cap along the top of the upright overhangs the wider side, and it’s this cap that locks the large molding in position within the jig. The corners of the base are cut at 45-degree angles to keep them out of the way of the blade.
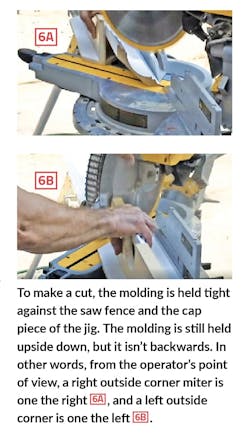
When in position for a cut, the molding is still upside down: the top edge is held tight into the corner where the saw fence meets the bed, and the bottom edge is tucked into the corner under the overhanging cap on the jig [6]. Although the molding is upside down, from the point of view of the carpenter looking down at the saw, the upright leg of the jig is the wall and the saw bed is the ceiling. That means a right outside corner miter is to the right, and a left outside corner miter is to the left. No mental gymnastics required.
For smaller moldings, Ricalde clamps a narrow strip along the short side of the jig at whatever height holds the molding flush to the jig and the saw bed. He tells us that he’s also experimented with a version of the jig with slots in the upright leg that allow for an adjustable stop, but it’s overly complicated, which is why he opted for this simpler version. But it does mean that larger moldings would need a dedicated jig. In fact, if you were running a lot of smaller-sized crown, rather than fooling with clamps, I think it would make sense to build a separate jig for each size of crown molding you work with, much the way Katz labels and saves his gauge blocks for different size molding.
Earlier I mentioned that crown molding could be held upside down against the near side of the miter box, except that it’s easier to hold larger moldings firmly while cutting with a tenon saw that cuts on the push stroke. A power miter saw eliminates the push-pull issue, and Ricalde’s jig eliminates the mental gymnastics associated with holding the crown upside down to cut it.
So the good news is that you now have a couple of options for consistently positioning crown molding for cuts with a power miter saw. The bad news is that not many walls and ceilings are flat and even fewer “square” corners are actually 90 degrees, particularly in older homes. Solutions for those issues, such as coping inside corners, is a good topic … for another day.
RELATED: A Jig for Ripping Crooked Lumber
