Kitchen Exhaust Checklist
Range hoods play a critical role in the kitchen mechanical system, especially in tight houses and after energy-efficient retrofits. If they’re not tied to a makeup air system, they make their own. And if the clearest path for makeup air is down the chimney, a large (400-plus cfm) kitchen exhaust fan can backdraft, pulling exhaust fumes, including deadly carbon monoxide, back into the house.
The mandatory ventilation rates set by the building codes and required to earn an Energy Star rating are based on ASHRAE 62.2, the standard that defines optimal ventilation rates for homes. There are special rules for large fans that run continuously, as in a commercial kitchen, but most residential range hoods are “intermittent use” fans that run for short periods of time and are manually turned on and off.
A great deal of information on kitchen ventilation requirements is available through Energy Star, the Home Ventilating Institute, and others. This article is adapted from the U.S. Department of Energy’s Building America Solution Center to provide a concise hit list for you to execute in the field.
Regardless of who installs a range hood—you, your electrician, or an appliance vendor—be sure to follow these five simple steps.
1 ] Choose the right size exhaust fan
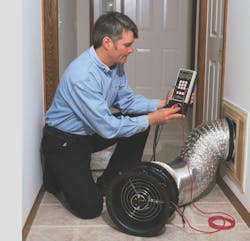
Kitchen fans intermittently operated should move 100 cfm of air or more. Because airflow can be reduced by many factors, including the diameter of the ducts and the length and number of bends in the duct run, Energy Star recommends selecting a fan with a rating of 150 cfm to 200 cfm to pull at least 100 cfm when measured. When possible, test the airflow before closing up the walls using a Minneapolis Duct Blaster (made by The Energy Conservatory) or a manometer and hood cover (see photo, below). This equipment can be expensive, so the most affordable option may be to hire a third party to conduct the test.
ASHRAE 62.2 provides an Alternative Compliance Path for ventilating existing homes, which allows you to leave an existing fan in the kitchen even if it doesn’t comply with the 100 cfm requirement. To count in the ventilation calculation, however, it must be properly ducted to the outside. And if you replace an existing fan, the new fan must meet the minimum cfm flow and sound requirements of ASHRAE 62.2.
Several free calculators, including one for ventilation, are available from Residential Energy Dynamics at redcalc.com.
Range-hood exhaust fans that are rated for more than 400 cfm must be installed to provide makeup air. One way to accomplish this is by wiring the exhaust fan to a motorized damper that operates whenever the fan is turned on. Systems are available to temper cold incoming air using heating elements.
2 ] Install the fan at the proper height above the stove
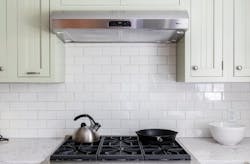
OK, but what is the proper height? That depends. Most manufacturers recommend installing the hood 30 inches above the cooking surface. Air capture will be better if the hood is closer to the cooktop, but the IRC sets 24 inches as minimum clearance, and the hood must extend the full width and depth of the cooktop. In addition, any combustibles adjacent to the hood opening must be protected with metal and insulation.
3 ] Vent the fan to the outside
Code requires venting range hoods to the outdoors, and specifically prohibits venting them into an attic, crawlspace, joist bay, or other area inside the building. A short run of straight duct is best; when bends are required, avoid sharp bends. Don’t use flex duct: Code requires duct with a “smooth interior surface” to avoid trapping grease and to allow for easy cleaning.
Large-diameter ducts trap less grease and provide better airflow. Reduced duct size also creates higher static pressure, which decreases airflow. Don’t dent the ducts either—misshapen ducts really change the way the air flows through the pipe, and not for the better.
Cut openings in the ceiling or walls as close as possible to the dimension of the exhaust duct, and air seal the opening with caulk or spray foam. Connect the exhaust duct to the fan box with mechanical fasteners, and seal all seams in the ductwork with metal tape, mastic, or both. Avoid using regular cloth-backed duct tape—it works for just about everything except sealing ducts.
4 ] Place the outlet at least 10 feet away from intake vents
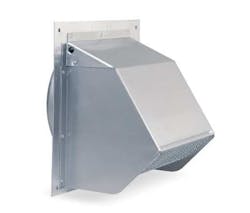
This is just common sense, really, but a surprising number of ducts exhaust near soffits or windows. Also be sure to use a vent cap that includes a backdraft damper and a louver or grill to keep out birds, mice, and chipmunks.
5 ] Turn the fan on and watch
The simplest and cheapest way to make sure that the fan is actually working as intended is to turn it on and watch what happens. Check outside to make sure the louver at the exhaust wall cap is working properly. Inside, you can use a smoke puffer or hold some thin paper streamers to make sure that air is moving into the hood.
Better is to test the flow rate. If the fan isn’t operating to its rated value, confirm that any openings cut in the ceiling and walls are sealed, that the exhaust duct is sealed to the fan, and that joints in the duct run are sealed. Also make sure that the homeowner understands the importance of cleaning the range-hood filter. An accumulation of grease and dust can seriously reduce airflow. Watch an airflow-testing video, here.
Click to purchase ($64) and download ASHRAE 62.2.
Duct-testing equipment, such as this TEC Minneapolis Duct Blaster with digital manometer, can measure airflow, static pressure, and other variables in a variety of ductwork. Photo: courtesy TruTechTools.com


