Lighting: Theory Meets Practice

My clients’ remodel is now complete, and I went by this summer to compare theory to reality. I also did a post-occupancy measurement of delivered footcandles (fc) on a major kitchen redo that I had modeled on computer. In both cases, the data, resoundingly supported earlier evidence-based lighting theory that the light level at the work surface depends on three factors: the fixture, the lamp, and especially the fixture location.
Mike and Holly’s Kitchen
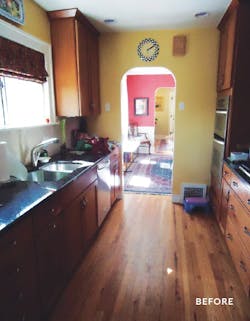
The bungalow kitchen in my earlier article received a minor makeover—taking down the wall between kitchen and dining room, installing new countertops, and adding a bunch of can lights to supplement the lonely surface-mounted ceiling light fixture. I visited Mike and Holly a couple of months after the remodel, and while sitting in the dining room, I was bothered by glare coming from the new recessed cans in the adjacent kitchen 15 feet away. I also noticed that the light quality was bland, without any highlights.
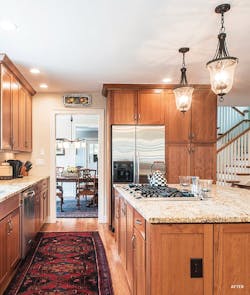
Before and after photos show how light levels in this Denver bungalow remodel by Parkside Remodeling and Doug Walter Architects were vastly improved by removing the wall between the existing kitchen and the family room, and installing a completely new lighting scheme.
Do Mike and Holly run their cans at 158fc? I doubt it—that’s what dimmers are for—but it’s nice to have it when you need it. Is 158 fc too much? Not when you compare it to daylight pouring in through the windows.
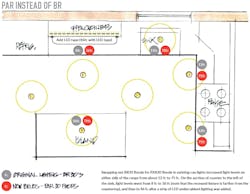
I repeated my lamp and fixture location experiments at another ongoing remodeling project with the help of my colleague Jeni Finnigan, an occupational therapist with an interest in home modification around lighting. After hearing about the relamping at Mike and Holly’s, she decided to relamp the cans in her own kitchen. The results (see “PAR Instead of BR,” above), show “before” light meter readings with BR30 floods and “after” readings with PAR30 floods that are three to five times higher. Though not as dramatic as Mike and Holly’s results, the layout of lights in Jeni’s kitchen is not ideal and in many locations you work in your own shadow. We discussed further improvements, such as the undercabinet LED tape light she installed to the left of the sink, which by itself adds 10 fc.

Bulb type can obviously make a huge difference in how much light actually makes it to the surface of a kitchen countertop, but even the biggest brightest bulb can be ineffective if the fixture isn’t properly located. After changing the bulbs in Jen’s kitchen, when I took measurements while she was standing at the counter my readings returned to their original levels—12 fc at the range and 8 fc to the left of the sink.
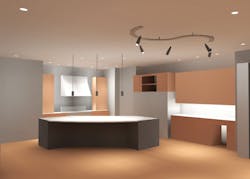
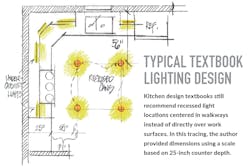
The tracing (see “Typical Textbook Lighting Design,” below) is typical of what kitchen designers find in lighting textbooks. I scaled the drawing, assuming the edge of the countertop is at 25 inches, and found that the can lights are located more than 50 inches from the wall—well beyond the 24 inches my research indicates is ideal.
To confirm my theory, I took before and after measurements on several subsequent remodeling projects, which gave me comparative data on light levels under real-world conditions. In one project, the data clearly show that relocating the cans to 24 inches yielded the best results by far in the situation that matters most—when a cook is standing at the counter (see, “Right Fixture, Right Location,” above right).

Now What?
There is still work to be done. For instance, my experience has been that 3- and 4-inch-diameter cans can’t deliver the lighting levels I want, so I have been using 5-inch cans in 8-foot ceilings. Recently, however, I have learned that dedicated LED light engines put out a lot more punch than medium-base fixtures equipped with screw-in LED bulbs, and also have double the lamp life. I am planning to gather data from working jobsites using smaller-diameter cans and various lens combinations to see what’s possible.
I am also currently collecting data to document the effects of layered light. But the point of all this is to show that good lighting design is neither art nor science, but a combination of both. Design-by-the-numbers alone won’t consistently create light levels that positively affect mood and well-being; good lighting design still requires an artist’s touch.
About the Author

Doug Walter
Doug Walter, of Doug Walter Architects, in Denver, has specialized in residential remodeling for 25 years. He has a long history with Universal Design and aging in place. He helped write the NAHB’s Certified Aging-in-Place Specialist curriculum and holds an ICC Certificate as an Accessibility Inspector.