Pattern Scribing and Tick-Sticking
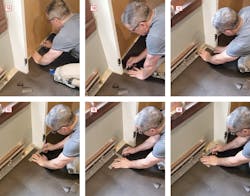
Strips of heavy paper are laid on the floor, leaving about a ½-inch border of exposed flooring around the perimeter. Seams between strips are taped, and the paper is taped to the floor through triangular cutouts to keep it from sliding around (1A). A series of scribes made against one leg of a 6x8-inch steel square laid against the wall leaves a line on the paper. At door jambs, marks are made on all sides, being careful to use the same leg of the square all around (1B & 1C). In places where the paper is too far away from the wall, such as under the hydronic baseboard on this project, the square can be flipped so the tip of one leg is against the wall (1D) and the scribe-line is annotated with either a “6” or an “8” to indicate the distance to the wall. Penetrations, such as water lines, are scribed on all sides as well (1E & 1F).
I remember the first time Stanley Martin, founder of Country Floors in Plainfield, Vt., installed sheet flooring in a 6x9 bathroom I was remodeling. He walked in carrying a 3-foot-wide roll of heavy paper, a small steel square, a roll of masking tape, and a pencil, and disappeared into the roughed-in bathroom. I was busy in another part of the house, and about 30 minutes later when I checked back with him, he was unrolling a piece of sheet flooring that had been cut to fit―and I mean precisely―the many-cornered floor of the bathroom.
It seemed like magic, so I made sure to watch him do his thing on the next flooring job. The secret is a technique called “pattern scribing,” which Stanley passed along to his son Chris, who, along with his son Caleb, still uses it today on many of the 55-year-old company’s installations. Instead of taking dimensions, checking for square, or measuring angles to ensure an accurate fit, the pattern scribing method uses a nearly full-size template to capture an outline of the floor perimeter―including corners, bump-outs, penetrations, and other obstructions. I photographed part of the scribing process during a recent installation.
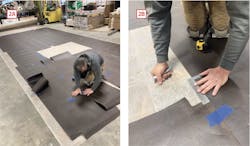
For most residential projects, the Martins take the template back to the company’s warehouse, which provides plenty of working room. After rolling out the finish flooring, they tape the paper template on top, taking care to properly orient it to the pattern in the material (2A). They cut the flooring in place by running a razor knife against the edge of the steel square laid along the lines on the template (2B).
As you might have guessed by now, the “magic” lies in simply reversing the scribing process to transfer the markings from the paper to the finish flooring. Voila! The shape of the finished product, which is larger than the template on all sides by the width of the leg of the steel square, exactly matches the shape of the room.
Chris Martin says that, because today’s sheet flooring is more pliable, making it easier to cut freehand in place, he is among the last of his contemporaries who still prefer pattern scribing. It hasn’t been easy, partly because the “scribing felt” paper he and his father once used (it was actually backing material for linoleum flooring) is no longer available. The thinner paper he’s using now is harder to work with because it’s more brittle, and because it’s black, pencil markings are hard to see, which has prompted a switch to silver Sharpies and white paint markers. But the technique is nearly foolproof, provided every installer consistently uses the 8-inch leg of the steel square as the primary scribing edge, and that all exceptions are treated the same way. That’s not much of a problem with Chris’s two-man, father-son crew: Chris says he could scribe a floor today, and Caleb could cut it six months from now without having to exchange so much as a word about how the template was made.
Scribing With a Ticking Stick
Pattern scribing works well for most straight-sided shapes, but as any boat builder can tell you, duplicating curves or complex irregular shapes is a job for a different scribing tool. It’s called a “ticking stick” (or “tick stick”), and although it’s been around for a long time, it’s relatively unknown among contemporary carpenters.
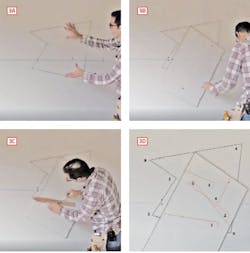
(3B) The first step is to cut a template that’s large enough to accept the scribe markings. He uses a scrap of drywall, which he tacks to the wall, but cardboard, plywood, or other flat stiff materials will also work. When positioning the template, it’s critical that it does not cover any of the five corners of the irregular shape to be filled. (3C) Ferguson uses a simple ticking stick made from a thin piece of scrap wood. He places the point of the stick over one corner of the area to be filled and traces a line along one edge of the ticking sticking, and a second line along the short square-cut end. This second mark is critical when it comes time to transfer the scribe marks (some ticking sticks have a notch or tick mark along the edge, which serves the same purpose).
(3D)When all five corners have been scribed, the template holds five L-shaped lines, each corresponding to one corner of the irregular shape. When a template has many lines, it helps to label each corner and corresponding scribe line (1, 2, 3 or a, b, c, etc.) for easy reference.
What is Tick Sticking?
In its simplest form, a ticking stick is cut from a thin piece of wood, with a point on one end and a “tick mark” or notch somewhere along one edge. As for how it works, pictures speak volumes, so for this article, I’ve drawn primarily on a video by drywall guru Myron Ferguson that’s available at ProTradeCraft.com in which he demonstrates how he uses a ticking stick to fill oddly-shaped areas with drywall. An online search yields several other good sources for how to make and use a ticking stick.
(3E) Next, Ferguson removes the template from the wall and tacks it to a fresh piece of drywall, making sure to leave enough room around the edges to accommodate the larger area of the patch. He then locates each of the five corners, one by one, by aligning the ticking stick with the L-shaped scribe lines on the template and making a mark on the fresh drywall at the point of the stick.
(3F) When all five corners have been marked, Ferguson uses a straight edge to connect the dots.
(3G) The cutout perfectly matches the irregular shape. With less forgiving materials and more complex shapes, such as curves, using more tick marks with smaller intervals between them leads to a more accurate cutout.
In Ferguson’s video, he tacks the template so that it overlays part of the shape he’s trying to duplicate, but he could also have placed a smaller template entirely inside the perimeter. This would be the approach when using a ticking stick to fit a shelf into a corner or between three walls. Ferguson also uses a very simple ticking stick that’s pointed at one end and square at the other, but other shapes are possible, and many users maintain several ticking sticks of different lengths.
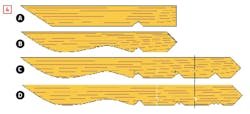
Types of Tick Sticks
The simplest ticking sticks have a point on one end and a “tick mark” or notch along one edge (A). Some have a point at both ends (B), which enables scribing from either end. A longer ticking stick with several notches or tick marks along the edge enables scribing of long, narrow shapes using a single ticking stick; the notches can be numbered (C) or carved in a distinctive way (D) that makes for an unambiguous reference point when transferring scribe marks from the template to the finish material.


