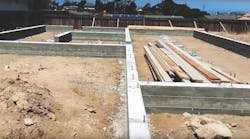
In those parts of the country where the frost line is deep and basements are the norm, foundations are typically built by specialty subs, who can afford to stock the necessary forms because they use them every day. But in places where the frost line is shallow and the ground never freezes, it’s not uncommon for general contractors to form and place shallow foundations themselves.
That’s the case near the coast in Northern California. There, foundations commonly consist of shallow concrete footings and stem walls, which are typically just tall enough to create a crawl space under the floor joists. For this article, we turned to a video by Dave Osland, in which he explains his method for forming the footings and stem walls together and placing the concrete for both in a single pour. Osland’s fast and efficient system gives him control over his schedule and makes for smooth sailing once the framing starts.
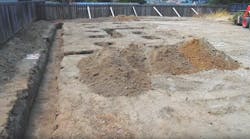
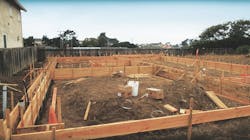
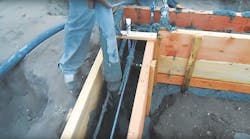
In areas with a shallow frost line and stable soil, carefully excavated trenches often serve as footings forms [1], and enable “monolithic” pours, in which footing and wall concrete are placed together. Horizontal 2x8s stacked on edge are screwed to wood 1x2 vertical uprights to form the walls [2]. The bottom of the walls forms are set above the bottom of the trench at top-of-footing elevation.
Forming and Bracing
Forming begins after the site has been scraped off to remove topsoil, vegetation, and other organic matter. Concrete footing trenches for the entire structure are machine excavated to accommodate 18x18-inch footings designed for a two-story structure [1]. Although the footings could be formed using 2-by stock, the required footing depth is typically shallow enough and the soil stable enough to permit trench footings, in which the walls of the excavation retain the concrete.
Wall forms consist of horizontal 2x8s stacked on edge and fastened to wood 1x2 vertical uprights [2]. Like most contractors, Osland used to fasten everything with duplex nails, but the advent of cordless screw guns changed all that. “We use screws to put everything together,” says Osland. “That way it comes apart easily, and if you need to adjust something you can just unscrew a board and reset it … There’s not a nail in this whole system here.”
RELATED: Help Space-Strapped Homeowners: Convert the Crawlspace to a Basement
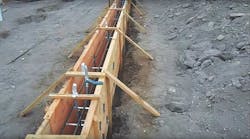
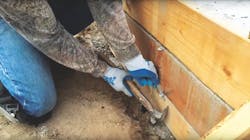
Wall forms are held together with the same type of slotted, flat metal ties used in reusable concrete forms. The ties, which also double as supports for rebar, are placed at regular intervals along the top of each course of 2x8 boards, and locked in place with metal wedges on both sides [3]. Osland cuts the tops off of all of the vertical stakes, as well as the diagonal “kickers” used to brace the wall forms. “That’s one reason I like wooden stakes as opposed to steel stakes,” he says. “There’s nothing in the way later when you go to rod this thing off.”
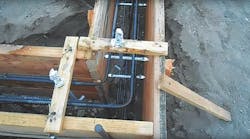
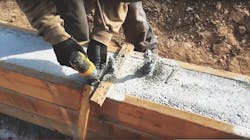
Osland does a couple of things during forming that also make his work easier later on. The wooden spreaders used to maintain an 8-inch space between inner and outer wall forms are drilled and placed to position the many anchor bolts required by seismic codes [4]. Each anchor bolt is held in place by the nut, which is threaded as needed to suspend the bolt at the proper height. And to keep the bolts from being encased in concrete during the pour, Osland wraps the exposed threads with aluminum foil. For the same reason, he also wraps the tops of the Simpson holdowns, which are positioned using Anchormate anchor bolt holders .
Spacing between inner and outer courses of wall forms is maintained using slotted metal form ties held in place with reusable metal wedges [3]. Spacing for the top course is maintained using wood 1-by spreaders, which are also drilled to position anchor bolts [4]. The tops of both the anchor bolts and the seismic holddowns are wrapped with aluminum foil to keep the nuts from being encased in concrete. Wood stakes and braces are trimmed flush to make it easier to strike the concrete later.
Placing Concrete
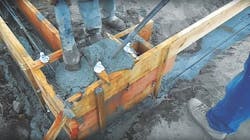
Using a concrete pump, Osland and his crew first place the footings using very stiff concrete [5]. This mix sets up fairly quickly, providing support for the wall concrete [6], which has more slump and is placed in a second pass. “We like to wet it up a little bit,” Osland says, “because then it fills up nice without any voids.” Voids are also minimized by vibrating the concrete as it is placed.
Footings are placed first using a very stiff concrete mix [5] that will set up quickly and support the wall concrete. Wall concrete is placed with more slump and is vibrated to minimize voids [6].
Stripping Forms
The first step in stripping the forms takes place about an hour after the wall pour is complete. By this time, the wall concrete is stiff enough to stay in place while the crew removes the vertical 1x2 stakes—which otherwise would be locked into the footing concrete. The rest of the forms are stripped the next day, beginning with removal of the form tie wedges. They are salvaged for reuse [7]. Later, the form ties are either snapped off or bent down against the concrete wall. Using screws to build the forms pays off when it comes to removing the spreaders and kickers [8]. So does the aluminum foil, which makes it easy to unscrew the anchor bolt nuts and slip the spreaders off.
The crew also uses this time to inspect the foundation for any high spots along the wall. In this case, the top of the wall was struck very cleanly. “But the concrete is still relatively soft,” says Osland, “so if there’s a chunk of something [that’s high] you can [easily] straighten it out.” Finally all of the 2x8 form boards are sorted and stacked for reuse as floor joists [9].
“We’re really happy there are no voids in here,” says Osland. “We took the time to get everything set right, [and] we had enough men on the job. You can’t ever have too many people on a job.”
Forms are stripped the next day, beginning with the removal of form tie wedges, which are salvaged for reuse [7]. Spreaders come away easily after the screws and anchor bolt nuts are removed [8], and kickers are salvaged for future use. All of the 2x8 form boards are sorted and stacked for reuse as floor joists [9].
