flexiblefullpage
interstitial1
Currently Reading

Quick-Release Knot

Advertisement
billboard
Jobsite Know-How

Quick-Release Knot

String lines are a simple way to keep things straight. But if the knot isn’t easy to tie and untie, the string keeps getting shorter.


By By Ben Bogie June 8, 2018
chalk lines made by quick release knot and professional remodeler doing remodeling
This article first appeared in the June 2018 issue of Pro Remodeler.

Laser levels are handy tools, but sometimes just stretching a chalk line or mason line does the trick. Anchoring a chalk line is easy: Slip the metal clip over a nail at one end, stretch out the line and lock it, then wind the line around a nail a couple of times. The locked chalk line reel holds everything in place.

But sometimes a dry mason line is the way to go. Anchoring one end is a simple matter of tying a loop in the line and slipping it over a nail. The other end, however, is where a lot of people get tangled up. Tying a loop or knot will hold everything in place, but you have to do it while holding tension on the line. And if you want to reuse the string over several different distances, that’s a lot of tying and untying. It’s a small thing, but it makes a difference when you’re trying to keep the job moving. And when you throw in cold, wet weather and bulky work gloves, fooling with knots becomes annoying.

My solution is to make a simple series of twists that hold the loop tight on the nail. It’s a quick and easy way to lock the line in place, and because there’s no knot, it’s also easy to release the line without having to untie anything. 


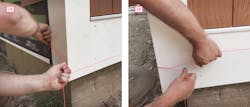
Stretch the line taut [1A] and fold it over to hook it around your finger [1B]. With your other hand, pinch the base of the loop.

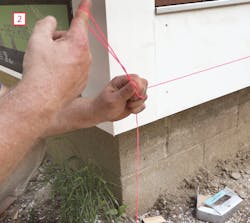
Now make a circular winding motion with your finger [2] to create a series of twists in the loop. I usually make five circles.

Next, hook the loop onto the nail [3A], then pull the string tight to create tension [3B] while taking up the slack on the loose end.

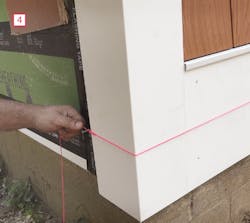
Finally, pull the free end of the line back to the nail to lock everything in place [4].

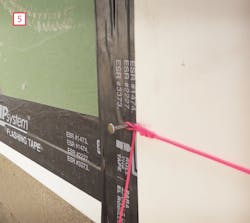
To release the line [5], just tug on the loose end to let off the tension.

Get more Jobsite Know-How here


written by

Ben Bogie

Ben Bogie is a second-generation custom builder and remodeler in New Milford, Conn. This article is adapted from a video made in conjunction with ProTradeCraft.com during construction of Professional Remodeler’s 2017 Model ReModel project.


Add new comment

Plain text

  • No HTML tags allowed.
  • Web page addresses and email addresses turn into links automatically.
  • Lines and paragraphs break automatically.
leaderboard2

Related Stories

How to Weatherize Roof-Wall Intersections

Mitigating moisture between changes of materials and panes requires special attention

3 Steps for Installing House Wrap and a Rainscreen

ProTradeCraft's Building Resilience walks you through how to install a self-adhered house wrap, liquid flash obstructions, and top it off with a rainscreen

How to Insulate a Heated, Structural Slab with XPS

ProTradeCraft's Building Resilience season three starts with making a basement more comfortable

How to Retrofit Foundation Footings

To make a low-height basement a more comfortable living space, this remodeler digs deeper but needs to add support to do so

6 Must-Knows for Installing Pocket Doors

Save your sanity: Do it right the first time

Crawl Spaces to Basements: Proceed with Caution

Converting a crawl space to other uses can upgrade a home and add significant value, but when done incorrectly, it can also be disastrous 

The Ins and Outs of Pedestal Tile Systems

A non-exhaustive overview of all things pedestal tile systems

How to Attach a Patio Roof to an Existing House

Discover expert tips on how to attach a patio roof to an existing house. Elevate your homeowner clients' outdoor living spaces with our comprehensive guide.

6 Tips for Electric Floor Heating Systems

These quick tips and tricks provide a base knowledge to begin your floor heating education

How To Improve Energy Performance in Existing Attics

There’s more to insulating the attic than attic insulation; there’s venting, air sealing, and misery

Advertisement
boombox2
Advertisement
halfpage2
Advertisement
native1

More in Category


Advertisement
native2
Advertisement
halfpage1
Advertisement
leaderboard1