How To Accurately Locate Framing Penetrations
In remodeling, penetrating a building’s frame—whether it’s an exterior wall, the roof, the floor, or a partition between rooms—is a risky business. We want to avoid cutting into a structural member or nicking an electrical wire or a water or gas line. We might also want to make sure that through whatever we’re poking, the hole aligns accurately with the finish materials on the other side, whether that’s door trim, siding, or roofing.
I recently revisited a couple of videos made by Matt Jackson, a long-time carpenter and frequent contributor to ProTradeCraft, in which he explains how he goes about it. In one project, he wants to locate two bath fan exhaust vents so that the ducts miss the wall framing and the housings outside align with a course of existing cedar shingle siding; in the other, he has to retrofit two floor outlets under living room furniture without nicking the wood I-joists below. In both cases, he uses a homemade locator bit that easily penetrates most materials, but creates a very small hole that’s simple to touch up. Let’s look at both projects, one at a time.
Locating Floor Outlets
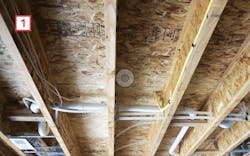
The clients wanted to add floor outlets in their living room to avoid having to run extension cords. Working from the living room side, Jackson first identified two general areas where the outlets would be near the lamps and also concealed by the furniture. Next he checked the basement. The ceiling was open, so he could easily see the not only the joists, but the wires, light fixtures, pipes, and ducts that occupied the joist bays [1]. Now came the hard part: precisely locating the outlets on the living room side so he didn’t run into anything when he cut the holes.
One way to avoid the I-joists and other obstacles in the floor would be to take a bunch of measurements in the living room, then transfer them to the basement, adding and subtracting as necessary to allow for reference-wall offsets and finish material thicknesses. Doable, yes, but complicated, especially for one person working alone.
Speed and accuracy are also a factor. “Measuring is time-consuming,” Jackson says, “and it has a lot of potential for error.” And that’s the problem, because eventually you have to commit to cutting a hole in the finish floor and you want to get it right the first time.
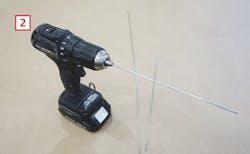
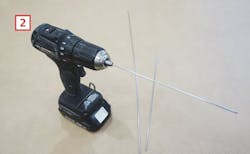
Jackson did, in fact, use a few rough dimensions from the living room to orient himself in the basement and make sure there were no major obstacles in the general area. But to confirm the exact location of the two floor outlets, he used a homemade locator bit made from a length of music wire [2].
The I-joists below the living room floor were visible from the basement, as were waste and water lines, electrical wiring, recessed lighting, and HVAC ducts that might get in the way when cutting holes for floor outlets.
A drill bit made from music wire is stiff enough to get through many construction materials, but it’s not brittle so it can flex without breaking. Short lengths of 8 to 12 inches are most useful, but lengths up to 24 inches come in handy for exploratory holes through thick material, such as blown-in attic insulation.
Making a Locator Bit
Music wire is a type of high-carbon steel that gets its name from its best-known use for piano strings. Because of its ability to withstand high tension and repeated stress, it is commonly used make springs, but it also comes “flat” in a variety of diameters.
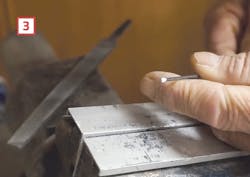
For his homemade locator bits, Jackson uses wire that’s 0.078 (5⁄64) inch in diameter. (It can be purchased at hardware stores, and is available online in packs of four 36-inch pieces for about $3.) He cuts the wire to length, then files cutting edges on one end [3]. “I file at an angle to create a two-edged chisel-point that is more than adequate to cut through most materials,” Jackson says.
Jackson keeps 8-, 12-, and 18-inch lengths in his tool box. “They’re not brittle like a drill bit, so they can flex quite a bit without breaking,” he says. “The 8-incher will easily drill through grout, cement backerboard, and subfloor. The 12-inch bit will go through drywall, sheathing, and siding in a probe through a finished wall.” Jackson says lengths over 18 inches are whippy but still useful for things like going through a finished ceiling into an attic, because the long wire is easy to see above the insulation.
The locator bit is made from a piece of music wire cut to length and filed at one end to create a two-sided, chisel point tip that can quickly and easily drill through most construction materials, including plywood, hardwood, and metal.
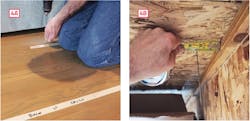
With the proposed outlet location marked on the floor, Jackson uses an 8-inch locator bit to drill a test hole through the hardwood [4A]. In the basement, he takes a measurement off the closest I-joist, which he’ll use to set the final location of the outlet [4B].
Drilling the Test Hole
With the preferred locations for the two outlets marked on the floor (using tape and erasable marker), Jackson drills a test hole with the locator bit, then heads into the basement to check the results [4]. For the outlet under the couch, he finds the locator bit 2¼ inches away from an I-joist. Back upstairs, he can measure off his pilot hole to make sure the outline of the outlet box stays within that dimension.
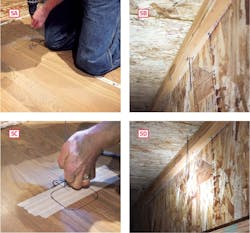
At the location of the other outlet, however, the bit has bored through the top flange of the I-joist [5]. After taking a quick measurement, Jackson heads back upstairs to make adjustments. There isn’t as much wiggle room here as for the other outlet, so the accuracy of using the locator bit pays off by enabling him to move the box the minimum needed to clear the I-joist. To make sure, he drills a second hole, and checks it in the basement.
After drilling a test hole at the proposed location for the second outlet [5A], a look in the basement reveals that the locator bit has passed through the top flange of an I-joist [5B]. After taking a measurement at the joist, Jackson relocates the outlet box and traces an outline on the floor, then drills a second test hole to confirm the location [5C]. Back in the basement, the locator bit clearly shows that the relocated outlet will miss the I-joist [5D].
“It’s so fast and easy to double-check the final location that I’m in the habit of doing it,” Jackson says. “I’m careful by nature, but on a bad day it would be just like me to make a mess of things and measure down instead of up or left instead of right.”
It’s worth noting that, had Jackson used a standard 1/8-inch wood-boring bit, it might not have been long enough to pass through the I-joist flange, making it impossible to find.
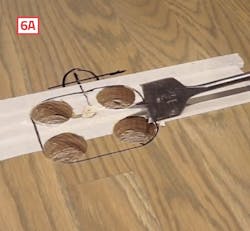
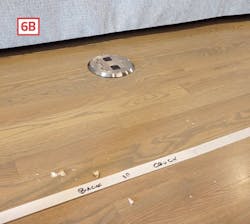
Now all that’s left is to cut the holes, and wire up the outlets [6].
Jackson used a spade bit to drill out the corners of the electrical box [6A], and finished the cut-out with a multi-tool. The finished outlet [6B] will be concealed under a couch.
Aligning Bath Vents
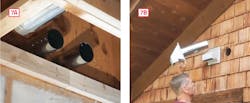
In the case of the bathroom exhaust vents, the interior side of the gable wall was open with the insulation removed, so the studs were clearly visible. The easy part was locating the vents above a horizontal wall plate and on either side of a stud in the gable wall [7]. The hard part was making sure that the vents were spaced far enough apart so the housings wouldn’t overlap, and that the bottom of the housings aligned with the shingles on the exterior side of the wall. “The overall goal is to be certain I drill the 4-inch holes in the right place the first time,” Jackson says. “If I’m off by even half an inch, I’d likely have to remove a large area of those old, fragile cedar shakes to cover my mistake.”
On the inside, the exhaust vents were located on either side of a stud just above a ceiling joist [7A]; on the outside, the goal was to align the bottom of the vent housings with the bottom of a course of existing cedar shingles [7B].
As with the floor outlets, one option would be to locate the stud and ceiling joist by taking a series of vertical and horizontal measurements off interior reference points, then transferring those dimensions to the exterior, adding or subtracting fractional amounts for wall and material thicknesses. Doable again, yes, but still complicated, especially for one person working alone, and with no guarantee to be accurate.
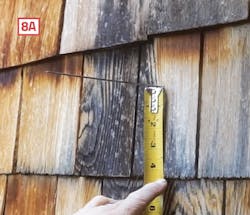
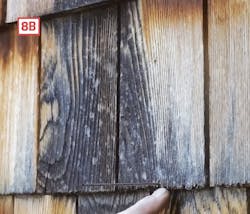
Instead, working from inside, Jackson marked the sheathing at the minimum clearances needed for the vents and housings to clear the stud and not overlap one another, horizontally, on the outside. Then he drilled a test hole with an 8-inch music-wire locator bit. Outside, after finding the bit, he measured to the bottom of the nearest course of shingles, then transferred that dimension to the sheathing inside and drilled a second test hole to doublecheck [8].
After finding the locator bit and measuring to the bottom of the course of shingles [8A], Jackson transferred the dimension to the sheathing inside and drilled a second hole to doublecheck. Outside, the locator bit confirms that the vents holes can be aligned with the siding and still clear the framing inside. [Note: In the video, the test holes shown here were drilled for demonstration purposes on another part of the wall. They illustrate the process used to locate the actual vents, which had already been installed.]
With the vent locations confirmed, Jackson was able to use a hole saw to drill from the outside. He then dry-fitted the vents, traced the outline of the housings, and removed a small strip of shingles in the course above to ensure the housings would lie flat against the siding.
“The music-wire locator bit is one of the most useful carpentry ‘hacks’ I know, and I use it frequently,” says Jackson. “A perfect example is an upcoming job where the client wants to remove a wing wall to open things up in the kitchen. To figure out what was possible, I simply poked a wire up through the ceiling to locate the wall in the attic, and also slipped the wire in behind baseboard and through the subfloor into the crawlspace. It took five minutes to get a confident answer instead of an hour of measuring for a shaky answer.”
Matt Jackson lives and works in Rapid City, South Dakota. He is a contributing editor to ProTradeCraft.com, and maintains two YouTube channels, The Digital Jobsite, dedicated to SketchUp how-to videos, and Next Level Carpentry, for construction tips and techniques. This article was adapted from two of his videos, “Right the First Time: Floor Outlets in Finished Floor” and “Through-Wall Location Tip for Vent Caps, Light Boxes, and Outlets.”
