Simple Soundproofing Solutions for Remodels
When I lived in Washington, D.C., one of the tenants in the townhouse next door chose to start his nightly saxophone practice at my bedtime. I liked the jazz and blues riffs he mixed in with scales and arpeggios, but it still took me longer to fall asleep. When asked to diagnose the cause, most remodelers will chalk it up to “thin walls.” While that’s often the case, it’s an oversimplification: the plastered townhouse party wall was constructed with terracotta blocks sandwiched between a wythe of brick on each side―anything but “thin.”
Fortunately, there are solutions to this kind of noise problem. In what follows, I look at soundproofing solutions that range from simple and inexpensive to more elaborate and costly. But first, it helps to take a quick look at how acoustics work.
Acoustics made simple for remodelers
Sound travels in waves at different frequencies and in all directions at once. But sound waves can’t travel at all without a medium. Here on earth, the primary medium is air (water is even better, if you’re a fish or live on a submarine). Without air, there is no “wave” to carry the sound from the source to our ears. So, when it comes to soundproofing, if you block air movement, you block sound.
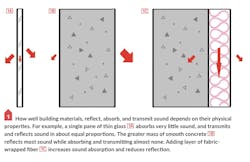
Not completely, though, because sound waves that bump into objects and surfaces are absorbed, reflected, and transmitted to varying degrees, depending on whether the surface material is hard or soft, smooth or rough, lightweight or dense. How all of this works is explained in a delightful four-part series of narrated video animations called “Architectural Acoustics” produced by Michael Ermann, a tenured professor at Virginia Tech’s School of Architecture + Design, and author of the book “Architectural Acoustics Illustrated.”
The animations go into greater detail and I highly recommend watching them, but for the purposes of most home remodeling, it all boils down to this: Effective soundproofing is the result of the materials you use, and how you connect or isolate them from each other. The research I did for this article points to three main strategies: minimize and isolate penetrations, add mass, and decouple surface materials from each other and from the structure. Here’s a closer look at how to do that.
Minimize and isolate penetrations
One area of home construction that has shined a light on noise issues is the trend toward relocating laundry rooms from the basement to an area closer to the bedrooms. That’s the case in “Soundproofing Cheap Tricks,” a video from Matt Risinger, a well-respected builder and construction video-blogger (and a technical adviser to ProTradeCraft.com). As Risinger explains, wall penetrations such as electrical switches and outlet boxes will defeat other soundproofing measures, so the first step is to keep them out of walls that separate noisy rooms from quiet spaces.
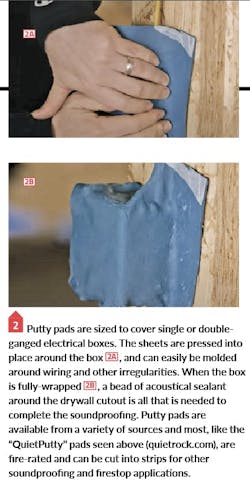
In the under-construction home that is the setting for his video, Risinger couldn’t eliminate penetrations in the wall separating the laundry room from the master bedroom, so he did the next best thing: he reduced their number. That left him with one outlet and one 4-gang switch-box penetration, both of which would still transmit sound because they connected air on one side of the wall with air on the other side. Risinger’s go-to solution is to isolate the penetrations with “putty pads,” thin, square sheets of malleable clay-like material that can be wrapped around electrical boxes and molded to conform to wiring, effectively sealing the box against air flow and stopping sound transmission.
Add Mass to reduce noise
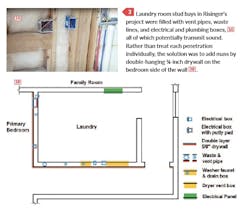
Putty pads help reduce or eliminate noise from an adjacent room by blocking direct transmission through penetrations, but some sound can still pass through plaster or drywall. Adding insulation to stud bays damps sound transmission somewhat, but pipes, ductwork, and other obstructions buried in the wall can reduce the effectiveness of insulation. The laundry room in the Risinger project had a number of these obstructions, including a 3½-inch stack for the bathroom directly above, a 2-inch vent pipe, a dryer box and ducting, a washing machine outlet box, plus supply lines, and more electrical boxes and wiring.
Risinger’s solution was to add mass to the bedroom side by double-hanging the wall with thicker ⅝-inch drywall. To prevent sound leaks through small air gaps, he caulked all joints, including those at wall-ceiling corners, with QuietSeal Pro acoustic sealant. Inside the wall, he added fiberglass batt insulation, which helps to damp sound transmission, and he also substituted cast iron for PVC at the waste stack, a relatively cost-effective way to add mass to a waste line to reduce the sound of draining water.
Mass Loaded Vinyl for budget soundproofing
Risinger’s solutions are budget-minded, which he justifies by explaining that owners living in a single-family, detached home have more control over when noisy activity takes place. Where that isn’t that case, however, an effective but more costly way to add mass is to install a layer of mass loaded vinyl against the studs before hanging the drywall. This soft sheet material is typically available in 48- or 54-inch-wide rolls, and in a variety of lengths, but as a practical matter, roll size will be determined by weight―the ⅛-inch-thick version weighs one pound per square foot, so a 25-foot roll of 48-inch-wide material (enough to cover the area behind two 4x12 sheets of drywall) will weigh 100 pounds. The material can be cut (or scored and torn) with a utility razor, and should be sealed at all seams with acoustic sealant. Based on a 100-square-foot roll, online prices vary between $1.10 and $1.30 per square foot, but shipping will add to the cost.
It’s best to hang drywall shortly after installing the mass loaded vinyl; staples will hold the heavy membrane in place temporarily, but drywall screws are needed to support it permanently, and the drywall will protect against damage. To work as intended, mass loaded vinyl should be installed against bare studs rather than between sheets of drywall. To understand why, the “Sound Advice” blog at the Acoustical Solutions website compares what happens to a baseball when you throw it against a bedsheet that’s hanging against a finished wall and one that’s hanging from a clothesline . In the first case, the ball bounces off the wall almost as if the sheet isn’t there. But in the case of the bedsheet on the clothesline, the ball quiSound-Damping Drywall
Another bare-stud or double-drywall solution is to use sound-damping drywall. These products sandwich a layer of sound-damping material between two layers of gypsum. Simply put, this layer acts like the soft, floppy bedsheet when sound waves cause the drywall to vibrate (for a more detailed description, see QuietRock’s “Sound Design Guide” at quietrock.com). The advantages over mass loaded vinyl are availability and the reduced installation labor of a drywall panel with an integral soundbarrier. As for cost, although sound-damping drywall is more than 4 times the price of standard drywall, it compares favorably when you factor in the cost of purchasing and installing mass loaded vinyl.
How to noiseproof double drywall
Double-hanging drywall goes a long way toward blocking sound transmission, provided you seal the seams with acoustic sealant. Using sound-damping drywall for the second layer, will improve performance, but another option is to spread a sound-damping compound between layers of standard drywall . Several products are available, including QuietRock’s QuietGlue Pro and Green Glue Company’s Green Glue Noiseproofing Compound, all of which create a viscoelastic layer that dissipates sound. The manufacturers claim these products are especially effective at reducing low-frequency noise. The 28-ouce tubes sell for about $16 each, and two tubes per 4x8 sheet of drywall are recommended. Despite their names, neither product is an adhesive, and standard drywall fasteners are still required.
Decouple the materials to soundproof walls
Each of the solutions, discussed so far can, by itself, reduce noise-transmission, but the best approaches combine several soundproofing measures. Because cost increases with each measure you add, matching the solution to the problem will often come down to budget. For big noise problems, one final soundproofing strategy is to decouple finish materials from the structure. Just as a thermal break prevents heat transfer through studs, creating an “acoustic break” prevents sound transmission.
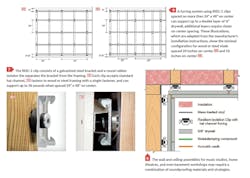
One common way to do this is to fur the wall using standard metal hat channel attached to specially-engineered acoustic standoffs. A variety of products are available, including Resilient Sound Isolation Clips (RISC-1) . Each clip can support up to 36 pounds, enough when properly spaced to support a double layer of ⅝-inch drywall. This solution obviously adds cost: each clip retails for about $4.75 and, at the required spacing, an 8x12-foot wall requires about 24 clips, plus channel . But soundproofing a music studio with a wall assembly that combines clips and channel with other soundproofing measures makes it possible for the band to rehearse without interrupting the sleep of the neighbors next door. And it’s hard to put a price on that.
