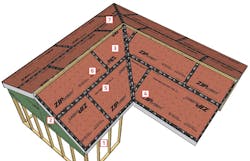
Pressure-sensitive tape is pretty sticky, but to work properly, you have to install it in the right sequence. As with lap siding or shingles, start at the bottom and work your way up so that water can drain without encountering fishmouths or damming where flashing materials overlap. Seal roof sheathing course by course, horizontal seams first, followed by vertical seams. With pressure-sensitive tape, be sure to press the tape into the roof deck with a roller to ensure it achieves maximum adhesion.
[1] Begin at the eaves and work your way to the ridge. To keep wind-driven rain out of the framing, seal the bottom edge of roof sheathing, turning the flashing tape down over the subfascia.
[2] Treat gable ends the same way, turning the tape over the edge of the sheathing onto the subfascia.
[3] Next, seal the valley with tape or peel-and-stick membrane, overlapping at least 1 inch on either side of the valley. If you can’t seal the full length with a single strip, start at the bottom and overlap subsequent strips as you work your way up the valley.
[4] Seal vertical seams in the first course of sheathing, overlapping the tape at the eaves and valleys.
[5] Then seal the horizontal seam between the first and second courses of sheathing, overlapping the vertical strips of tape.
[6] Continue up the roof, sealing vertical seams so they overlap the tape on the horizontal seams below, and sealing horizontal seams so they overlap the tops of the tape at vertical seams.
[7] Seal hips last, overlapping at least 1 inch on either side.
Get more Jobsite Know-How here
Adapted from “Stormproof Roof Deck: Seam Taping Sequence,” one in a series of videos and animations about stormproof roofs produced by ProTradeCraft.com with help from Huber Engineered Woods, Inc.
