Remodeler Michael Anschel of OA Design+Build+Architecture wants to provide a resilient, comfortable, and beautiful new basement in this 100-year-old Minneapolis home. To do so, he wants to ensure he gives these homeowners a well-insulated sub slab. (He even goes the extra mile to plan for hydronic tubing for a heated floor.)
The remodeling work being done on the home’s first floor made this project necessary. The first floor work resulted in major structural changes, which then resulted in needing to replace the primary footings used to hold the central bearing beam of the home.
“And to do that was pretty easy. We cut open the slab, we dug down some ways, we poured a new footing, and we were able to replace all of that,” explains Anschel. “When it comes to the perimeter though, it gets a lot more challenging.”
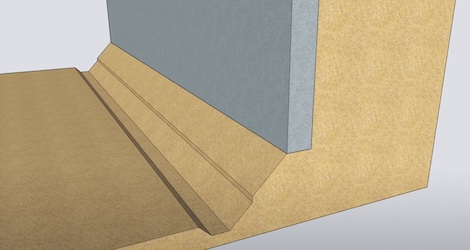
The foundation had no footing underneath, so the team must retrofit some.
Then come the fun parts: insulating and heating.
Why Retrofit Footings?
It’s a result of the work on the home’s first floor that impacts the lower level. As it stands, the basement is barely tall enough for people to comfortably walk through.
So, the OA team plans to remove 19 inches of soil to drop the basement floor. This gives them the opportunity to transform the space into a comfortable living area with insulation and added heat.
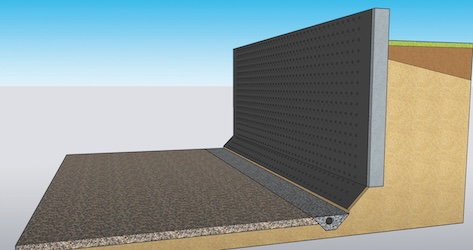
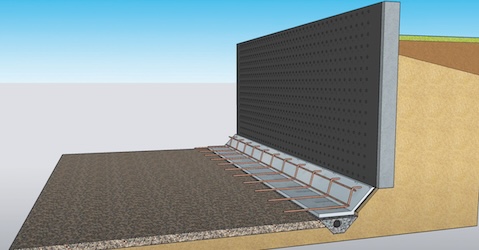
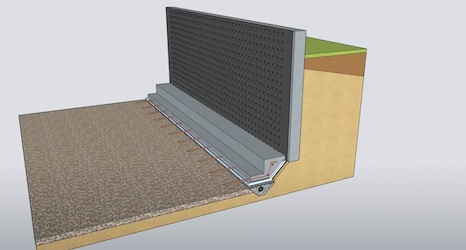
But before any of that can happen, the remodeling team needs to retrofit footings to the existing foundation.
Retrofitting Footings
Insulating The Slab
Project architects selected expanded polystyrene insulation (EPS) rather than extruded polystyrene (XPS). EPS is better environmentally, but it’s outperformed by XPS when placed under the slab.
The team went with DuPont’s new XPS, the ST-100 Series. It’s a low global warming potential (GWP) product that meets the needs of the install: 25 PSI and a 0.1% water absorption.
Dissecting Under the Slab
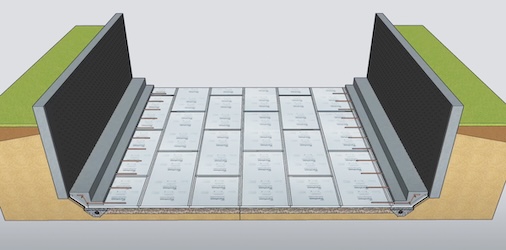
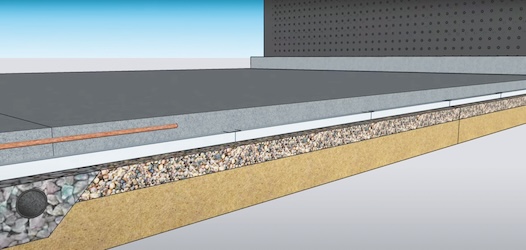
Before adding the insulation, the team sets a smooth layer of crushed rock, ¾-inch in diameter or larger, on top of the sand. On top, the team places two inches minimum of the XPS insulation. These are slipped under bent up rebar. On top, the team places a plastic sheet.
An important factor of the layer, Anschel points out, is the capillary break—the crushed rock.
“And the reason that works so well is while sand particles are really close to each other, water can work its way up through the sand,” he explains. “But with the crushed rock, the voids are too large for water, which is fairly sticky stuff, to work its way up. So, the rock is your capillary break.”
After placing the XPS, which creates a smooth foundation for the next trades, the team checks the elevation of the sheet with a laser. They continue this process until they cover the entire floor, working with large perimeter sheets and cutting sheets to fit into those tricky spots.
Installing Floor Heating
Before the team staples the hydronic tubing in place, the seams between XPS sheets are taped. This helps the slab cure slower.
While the plumbers installed tubing under the slab, they also went ahead and stapled hydronic tubing under the first floor, the basement ceiling.
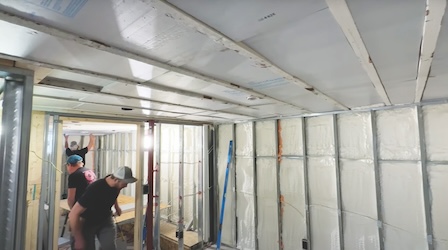
ProTradeCraft outlines that the tubing is stapled into the joists about two inches below the subfloor. A reflective bubble wrap radiant barrier will work to reflect heat into the subfloor. Friction fitting in styrofoam insulation between the joists restricts heat flow. It’s then all covered in drywall.
Comments (1)
Add new comment
Related Stories
17 Insights On How Remodelers Can Better Communicate With Clients
Industry advisor Mark Richardson says your delivery is as important as your words
Treasury and IRS Issue Guidance For Energy-Efficient Home Improvement Credits
Homeowners could only claim energy-efficient tax credits for products registered with the IRS under proposed legislation
Utah Tops for Home Improvement Loans, But Not Spending
Where the most home improvement loans are being secured and where the most money is being borrowed
True Value Files for Bankruptcy, Agrees to Sale
The 75-year-old hardware wholesaler said store operations will be unaffected as it proceeds with sale to Do It Best
5 Leadership Necessities for Successful Home Improvement Managers
These core principals can help managers guide their teams to success
7 Ways to Hone Your Podcasting Skills
Home improvement pro and podcast host Jeremy Owens says these strategies helped him find his voice
10 Top-Notch Training Tips for Remodelers
Industry advisor Mark Richardson suggests using these guidelines to create a stronger performing, better aligned team
The Not-so-secrets of Success
The most successful home improvement companies have managers that lead with accountability and strength
Entry Door Trends And Options With ProVia Product Manager Brandon Morris
On this episode of Home Improvement Innovators, ProVia Entry Door Product Manager Brandon Morris joins host Jay Schneider to talk about entry door trends
7 Strategies To Ensure Success Before and After Private Equity Acquisition
Home improvement companies and private equity firms aren’t always a perfect match, so this consultant ensures both companies are set up for success




Informative Content
Submitted by Stone Cabinet Works (not verified) on Tue, 09/24/2024 - 07:28
Informative Content
This basement transformation sounds incredible! The attention to detail in retrofitting footings and adding heated floors will surely create a cozy and functional living space for the homeowners.